January 31, 2011

Introducing...

Two new designers to the YMH Designs blog! I want to thank our ladies who were with us for the last 6 months for the fabulous job they have done inspiring creativity. But 3 of them have decided to move on. So, picking up where they left off will be Emily and Nancy!
Starting in February, Emily will be posting her creations on Mondays. If you just can't wait till next week to see her work you can pop over to her blog and check out what she's been up to.
Emily wanted to share a little about herself with you:
I'm Emily (you can call me Em) from the St. Louis, MO area. I am mother to two awesome kids, Austin and Serenity. I also have a VERY supportive boyfriend, Keith who is very understanding about my scrapbooking! I am a full-time Director of Sales/Assistant GM of a hotel in the STL area. I have been creating in this fashion since the beginning of 2009 when I was given a scrapbook kit for my birthday. I was hooked immediately! I love to create layouts, mini's altered items, canvas, and so much more! I really like to find new ways to use my supplies! I am very excited to be a part of the Your Memories Here team and inspire you all with the wonderful products in the store! I look forward to getting to know you all! Thank you to Kristina and the rest of the gals for this awesome opportunity!

On Wednesdays (starting with Groundhog Day) you will find Nancy's inspiring designs. You may remember Nancy from when she was our guest designer for a month. For more peeks of Nancy's creations check out her blog.
I know our sweet blog readers are going to make these girls feel right at home here.
Oh, and if you're doing the math, you probably noticed that I said 3 ladies stepped down and we've added 2 new designers which means there is one spot/day open. Well, I have a few ideas for what we'll do with that extra day. But you're going to have to wait to find out what :)

Enjoy your Monday!

January 29, 2011

Live with Prima Leftovers


I'm still creating with my extras from the last Live with Prima kit. For my YMH post this week I've created this sweet little clear tag. I took a clear acylic tag I've had laying around and covered it with the Prima Damask transparency. Once the glue dried I cut around the tag to remove the extra and then used the Dots Cuttlebug folder on the blue c/s. The music sheet was created by heat embossing a music stamp from WMS and was then layered with some white lace. The senitment came from WMS as well and the flower and bling is from another Live with Prima kit I had. I think this would look great on a gift to a loved one. I'm still not done playing with my leftovers. Next week I'll have another project with them.

January 27, 2011

Canvas Lace Bin

 Hi crafty friends! Today I have an altered little canvas bin. I loved the color and thought I could make it even better with some PRIMA! Everything's better with Prima right?? lol
 I don't have much time for this post (darn work) but I do want to tell you that yourmemorieshere.com has the most beautiful Prima flowers and lace. Not to mention paper, bling and Live With Prima Kits! So please go check out the website and treat yourself to some beautiful products and great prices!
 Those flowers are gorgeous and that lace is so pretty!
I made the leaves out of Prima packaging and used some Glimmer Mist to add some sparkle. I hope you all have a fabulous day!! Sorry to post and run but I gotta get going.

I'd rather be scrapping. :(
    ~Kim

January 25, 2011

Upcycling - It's not a made up word!

Today's project requires you to eat an entire carton of ice cream. Do you think you can do that? If your answer is undoubtedly YES! Then you're my kind of crafter :)

First I took said ice cream container and washed it out real good (we don't need to attract any bugs) Then I let it sit on my counter for about a week so my kids could ask me at least 3 times a day "Mom, can I have that ice cream?" and I would answer "no, it's empty" but still they asked every single day. So to end their torture, I finally came up with a plan as to what I was going to do with this container.
*little background story*
A couple of weeks ago the very crafty LollyChops made THESE and I was so inspired by her class that I wanted to make one too. But I keep putting off finishing up that box of cheese (and yes, I know I can wrap it up in plastic and steal the box) but this carton of ice cream came available much quicker ;)
So, an assortment of Cosmo Cricket "Hey Sugar" papers and paper embellies arrived at YMH this weekend and I was in love. Inspiration was born!

Measure your container (mine was 5" tall by 16" around) so I cut my Cosmo Cricket " Be Mine" paper 5"x12" and then pieced in another small piece of paper 5" x 6" to overlap.

I slathered up the sides with Mod Podge and wrapped the paper around. I used clothes pins (as a second set of hands) and rubber bands to hold it in place while the glue dried.

I painted the lid with several coats of pink acrylic craft paint.* At first I didn't think the paint was going to stick because of the shiny finish of the carton but after the first coat dried the rest went on with no problem.

Then I cut a strip of my patterned paper (this is the same paper as the body of the carton, just the reverse side!) I also glued it with Mod Podge and banded it till it was dry.

I kinda skipped ahead with the photos so let me catch you up:
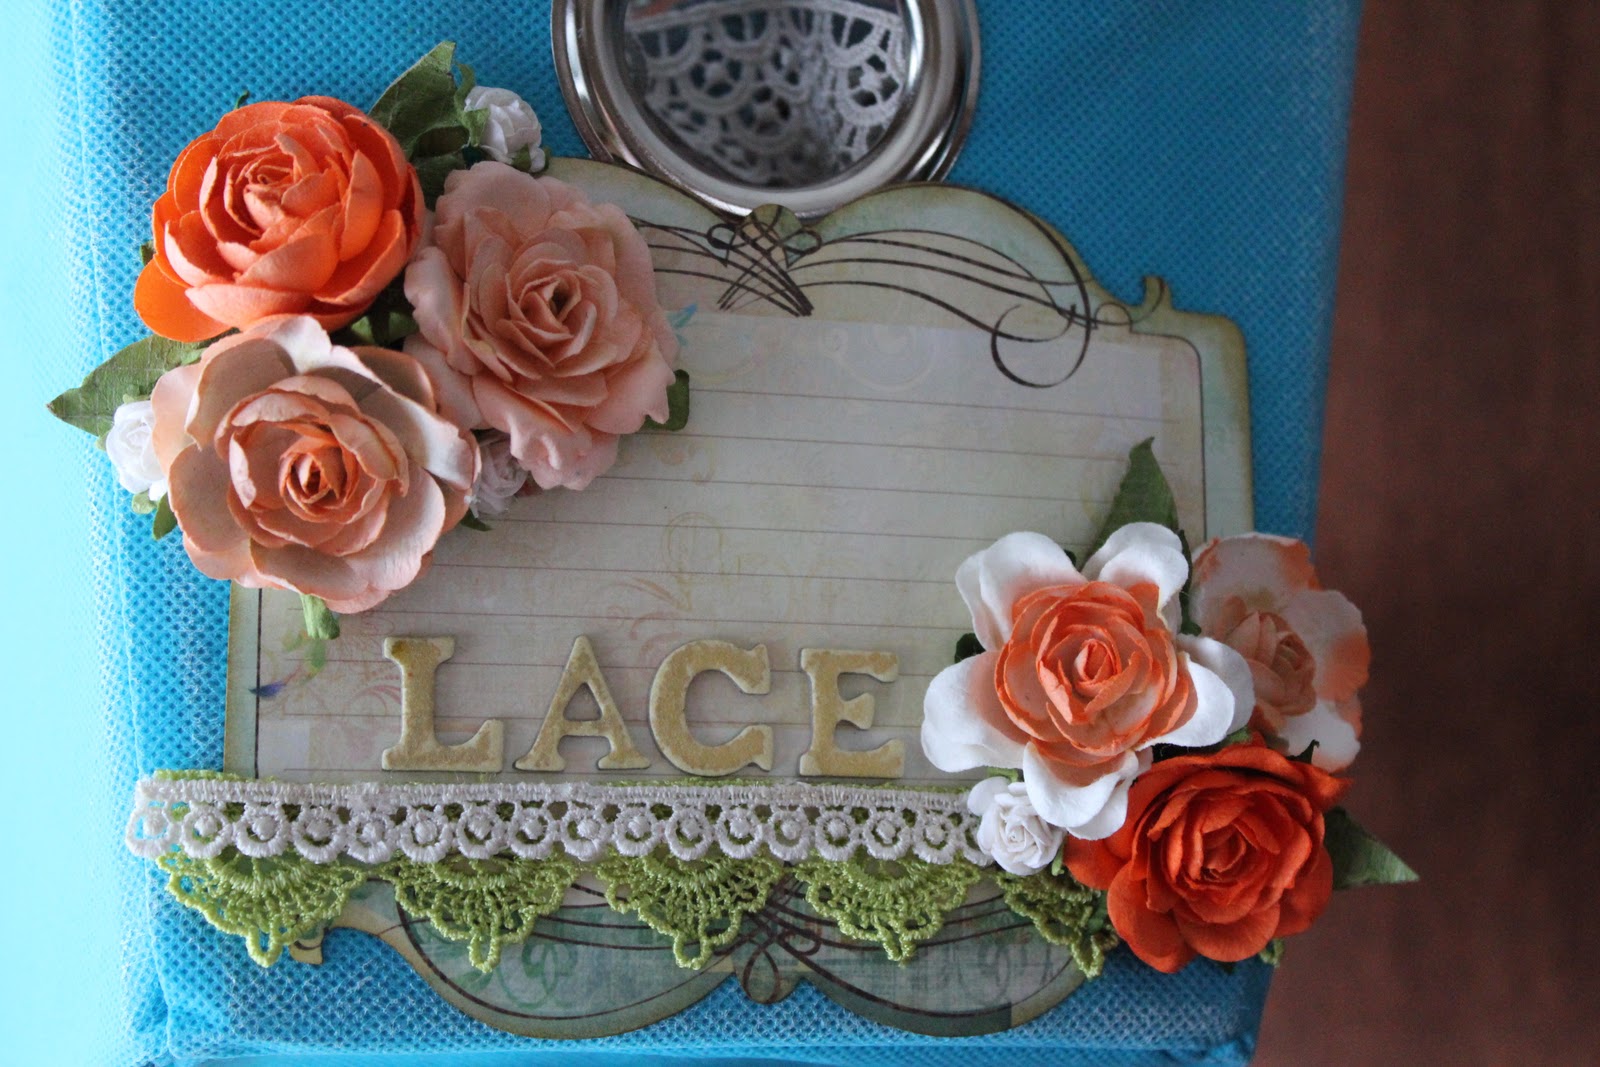
Next I used the "strip tease" card stock with the various funny sayings and patterns on it and selected the one that says "Smile, it's the second best thing you can do with your lips." I used it to make a belly band to go around my carton (and had to piece another bit of paper to fill the gap - remember our circumference is 16" and our paper is only 12") I glued that on with my ATG gun. Then I used my Webster's Pages trims to make a soft aqua band around the lid and the sheer net trim around the belly band ( I used hot glue to attach both of those).

For the lid I cut a 4 1/2" circle out of the "Honey, Honey" paper and glued it in place. Then I added a large, pink Prima flower and gathered some Prima trim into a flower shape and hot glued that down on top of the pink flower and lastly glued an aqua Prima Fairytale rose on the top of that.

I whipped up a couple of beaded hat pins to stick in my flower stack for a little touch of "bling".

For this entire project I used 1 whole sheet of 12"x12" paper, a small strip of the "strip tease" paper and a circle from another sheet (which I could have gotten out of the fist piece of card stock, but I wanted a contrasting paper) So that leaves 10 and 3/4 sheets of card stock plus all the other embellies in the kit for many more projects! This $10 kit goes a looooong way!

This little cute doesn't have a designated purpose yet but since nothing about those papers say that it's for Valentine's day, I'm thinking I can use it for whatever I want!


January 23, 2011

Love You Lots!

This is my mom's Valentine card:) She doesn't check blogs so I'm safe posting it. I used some lovely Oopsie Daisy paper from Imaginisce for a mat for my spray of hydrangea flowers from Prima. I embossed the background with the Damask embossing folder, probably one of my very favorite folders. I finished it off with an inked doily, a little tag for my sentiment, a felt heart and a punched butterfly. Be sure to stop by the Your Memories Here store to see what's new! Enjoy your day:)

One Fine Day LO


Once again it is a fabulous Sunday & I'm back to share with you another creation for Your Memories Here...the fabulous paper craft store with great prices! Plus, Kristina just got a new Cosmo Cricket kit in her store that is just AWESOME...you must check it out HERE! I just love how this LO of our son & his girlfriend turned out; definitely my fave pic of them together! I took it this past fall when we took her along on our annual trek to the pumpkin patch. It was a perfect day & I thought this title just summed that up so well. 


ALL of the paper I used is by Pebbles Inc., from their Twitterpated collection....YMH has some fun Pebbles products in stock too! I usually don't use such bright & sassy colors but I loved this combo & these papers! I also used some of the Pebbles paper to make a faux ruffled ribbon trim...easy & cute! And for once, I didn't use my Tattered Angels Glimmer Mists...lol! The pearls I used for the flowers centers are by Prima...you do know I can't stay away from Prima, right?! hehehe!


Supplies:
Pearls - Prima
Tiny Type Letters - Cosmo Cricket
Brown Letters/Adhesive Button - American Craft
Pen - Sakura


Thanks so much for stopping by visiting! I hope you take the time to check out the YMH Store & visit my blog too if you'd like! Happy Craftin'!!  

January 22, 2011

I've gotten my Live with Prima tray completed. I am really enjoying these kits that YMH have from LWP. The kits include so much that I can still create several more items with what's leftover. I changed a few little details from the original to make it fit me more and what I had handy. My oldest has seen it and wants it hanging in his room, lol. Not sure where it will go just yet but I'm itching to hang it up. LOVE all the goodness that comes in these fabby kits. My goal for next week is to have something created with some of the leftovers from this kit. Be sure to pick up your LWP kit from YMH now.


January 21, 2011

Good Intentions...

Hi everyone!
Happy Friday :)
Today I have a card I had every intention of making a CAS (Clean & Simple) card but... I just couldn't stop adding embellies :(
Here's my card:
 I think this card has a shabby chic feel to it, which I don't do very often :)

I used papers from the Santa/Sweet Season collection from Webster's Pages. It's "supposed" to be Christmas paper but I ask you: Does this look like a Christmas card???  You could easily use most of the papers in a non-Christmas sort of way. Anyhoo, this is a beautiful collection & if you know Webster's pages, you know what I'm talking about :) I used my Beaded Ovals Nesties to cut out the oval. I punched holes around it & threaded some ribbon through them. Then I added some Prima roses & pearls. The sentiment reads: "May you always have Love to share, Health to spare, & Friends that care."
Here's a closer peek of that:

And here's a peek of the innies:
I cut out one side of the cover page where all the paper info is printed I adhered it to create a side border for the card innies. It was much too pretty to just throw out. To finish, I did some stitching around all the edges- faux for me. Like I said, I tried to go CAS but it just is my kryptonite :( ah well... I'll keep trying...

You can find all the goodies for this card at the YMH store---> Here. While you're there, check out all the new, fab goodies Prima is releasing in time for CHA!

Thanks for peeking today!
Gotta Go!

January 20, 2011

Luv U Wall Hanging


 Hello and Happy Thursday! Today I have an altered chip board page I made into a wall hanging. I used white gesso to cover up the brown and then used FolkArt paint #904 Lemonade to coat the whole thing. I used the backing to a felt Prima border as a mask then misted the bottom lightly with Dragonfly and Turquoise Blue Glimmer Mist. I then lightly sprayed over the top, little butterfly and tiny flowers with Tutti Fruitti Glimmer Mist.
 The butterfly I cut out of a Prima Fairy Flora journaling card. The flowers are gorgeous and the leaves and alphabets are Prima too. Yep, I love me some Prima! The lace across the bottom was white to begin with and I sprayed it with Tutti Fruitti Glimmer Mist. I used Prima lace to tie it all up. I just love the colors together.
Make sure to stop by Your Memories Here to see all the new fun stuff added all the time! Just wait and see what CHA things will be listed soon! The Live With Prima kits are awesome and well priced! Go check it out!

This one's for you Lydia! Miss you!

Hope you have a fabulous day!
Kim

January 18, 2011

Another One Done

Happy Tuesday! Did you all have a long weekend too? My girls didn't have school yesterday for Dr. Martin Luther King's Day so we kinda vegetated all day :)
I did a little more work on my mini album this weekend (it's a slow work in progress) Remember the cover page HERE

The background paper on this page is from the DCWV Mariposa stack. I'm using the 8"x8" stack for this since my mini album is only a 6"x6" so there is minimal waste and the images are more to scale than if I were to use the 12"x12" papers cut down.

The bird cage on my page was cut on my Cricut using the Bloom Lite cartridge. I cut out the first layer once in blue, then the shadow layer twice, in olive green and then in dark green. I inked all three layers with Peeled Paint Distress Ink and off set the dark green shadow layer just slightly from the olive green shadow layer. This cut also has flowers with it but instead of using those I added Prima flowers clustered and layered. And those little leaves you see peeking out from behind the flowers, those are a green "got flowers" style 5 petal flower that I cut into sections to use as tiny leaves. I wished I had taken a photo to better explain, but basically you cut it into 5 pieces at the natural separation down to the middle and each one looks like a little heart when it's cut apart.

My little "free bird" is a Tattered Angels glimmer chip. I inked it along his belly and tail feathers area with some Denim Jean Distress Ink and then sprayed it all over with Glimmer mist. The inking really brings out the embossing on the glimmer chips. I added a tiny black adhesive pearl for an eye and called him done!
Overall, I didn't do much on this page but that's because I'm saving room for a photo.
Who knows, maybe I'll even get this entire album finished this year?!

January 17, 2011

Great Grandma LO

Happy Monday! My LO today uses lots of Prima goodies, the flowers, lace trim and trimmed out butterflies from the Wings stamp set. The paper is from Imaginisce, Oopsie Daisy and for a few finishing touches I used a few Dew Drops. I hope you are having a great start to your week! Thanks for dropping by:)

January 16, 2011

Shabby Chic Adoption Card


Hi y'all...I'm a little late with this post so please forgive me! I'm here to share a sweet little card that is for a friend's shower this coming weekend. Her & her husband are adopting a baby girl next month; not only will they get to bring her home from the hospital, but they are supposed to participate in her birth as well! How cool is that?! I am soooo happy for them & super excited to make my first diaper cake for the shower on Saturday. I'll be back with photos of that on my blog later in the week so wish me luck...lol!


Supplies from YMH Store:
Patterned Paper - Prima packaging, Imaginisce
Solid Pink - Misted w/Tattered Angels Glimmer Mist
Bling/Pearls/Flowers/Lace - Prima
Carriage Stamp - Imaginisce


My favorite thing about this card is probably the Prima packaging I was able to upcycle & use as my background...also, I love that I was able to make a sheet of paper match using my Tattered Angels Glimmer Mist in Vintage Pink. I am so addicted to all things Prima & Tattered Angels!! If you are also an addict like me, hop on over to the Your Memories Here Store for some amazing deals on the products. Not to mention that there are new shipments of Prima/Marion Smith coming in & you can pre-order RIGHT NOW! If you would like some more info. about my card, you can always visit me on my blog, too...until next time, Happy Craftin'!

January 15, 2011

Prima Tease

So my project is finished yet for ya'll as it's been a rough start of the year. I didn't want ya'll to think I forgot either so I thought I would should you my work in progress project. It is a Prima Live kit that YMH sold. If ya'll haven't tried one of the Live with Prima kits you really do need to check out YMH section and start. The video link is even paired with the kit so you don't have to go hunting for it.


Here's my desk covered with Prima goodness from the FAB kit.


I have finished the ATCs and now need to work on the main branch. My current problem with that is finding my hot glue gun, lol. My oldest saw it and asked when I will be done so that he can decide where it should go, lol.

January 14, 2011

More Prima Peeks

Hi everyone! We're back with some more pretty Prima peeks! I'm sure you've been catching some glimpses of what's in store for us craft enthusiasts after the 2011 Winter CHA at the end of this month.Do you have any favorites so far? We have a couple more peeks to share with you and some special offers.


How gorgeous are those? And if you want to see some more Prima peeks stop by their blog because they are sharing bits and pieces of their new product lines every couple of days!
If you like what you see and can't wait to get your hands on some, we have a special offer for you to be first in line when they start shipping:
For a limited time you can pre-order a "grab bag" box of new Prima 2011 products. There will be a mix of flowers (which Prima is famous for) lace trims, papers, crystals and other incredible never before seen embellishments!

We're offering 3 sizes of "grab bags"

Small: containing over $70 retail value of product for only $50 shipped!

Medium: containing over $100 retail value of product for only $70 shipped!

Large: containing over $160 retail value of product for only $125 shipped!

These boxes will begin shipping in early-mid February but this offer is only good for a limited time!
Also don't forget about our Prima Vintage Trinkets Pre-Order - today is the last day to get your order in for those!

Messy No More

Hello Friday! and Hello crafty ones!
Do you have Glimmer Mist & want to die your ribbons to match the color but don't like messy, inky fingers :( Well, today I thought I'd share the way I dye my ribbon using Tattered Angels Glimmer Mist. I thought I'd make a little tut for ya.
Here we go:
 You'll need a sandwich baggie, ribbon of your choice, & glimmer mist.


                                                  Spray some glimmer mist in the bag


 Add your ribbon & seal the bag WELL. Make sure it's sealed (with a kiss if you want ;)


                                          Add more dye until you reach the desired color.
Work the ribbon with your fingers (on the outside of the bag) so it's absorbing the glimmer mist.

 Then you're ready to remove the ribbon from the bag & lay it flat on a protected surface.


 Let it dry or if you're as impatient as I am, use your heat tool :) Remember to use a heat-resistant mat or surface.


 Here it is dry & ready to use! You can see what I started with & the color I achieved. It will lighten a bit once it dries. But best of all, there's not a drop of glimmer mist on my hands! Dang, I should have taken a pic of that :(


Easy peasy! So what did I do with that ribbon trim?
This:

I made a simple little card :) I also sprayed the Prima Flower with Glimmer Mist as well, used pink satin ribbon for the ribbon ruffle, & stamped "Be Mine" to make a border. This card was a total CAS card for me!


You can find loads of yummy Tattered Angels Glimmer Mist colors, Prima flowers, & the Bella lace trim I used for my card (& others) at the YMH Store.

Thanks for peeking today & I hope this tut was helpful :)
Gotta Go!