January 30, 2012

Spring Friendship Mini Album- DT for YMH

This mini seemed to take forever to get done but I just can't wait to share it with you all.. It was amazingly fun to create and I got to use some of my very favorite supplies, one being Prima papers and flowers..Oh My!! and let me tell you all, I must be one of the luckiest people to be able to work with Prima's and I get mine from Your Memories Here.. As you all know, I live in Finland so finding Prima supplies here is rare to none, and you all should know by now, that I hold a special place in my heart for suppliers that ship international and Kristina from YMH does..  I'm always eye balling her stuff (<---that sounded weird..LOL)  to see what I can get and put together and so, that's where this mini album comes in...

I found some pink business sized envelopes in my stash, some sheets of chipboard, my butterfly punch, stamps, loads of Prima goodies and went to town..  I was in my creative zone for three days and finally, here is what I ended up with:


This cute & puffy mini measures 6.5" long and 4.5" wide.. I cut my own tags out of chipboard and attached them in between the envelope pockets.. and all of the papers I used on this mini came in the Sparkling Spring Collection by Prima..I am a sucker for these 6x6 paper pads cause they are so versatile and go a long way.. I mean seriously, I made a few cards last week with it and now, I have a mini album all done, plus I have loads of paper left for more projects.. 

here are a few close ups:

see what I mean about being puffy?..LOL  
I took a Tim Holtz clip and tied some white ribbon to it, to help keep it closed..LOL


The inside.. Had a hard time trying to get good photos of all the pages cause
they didn't wanna cooperate..LOL

The first page.. made two pockets with the bit of envelope I cut off the one end and the other
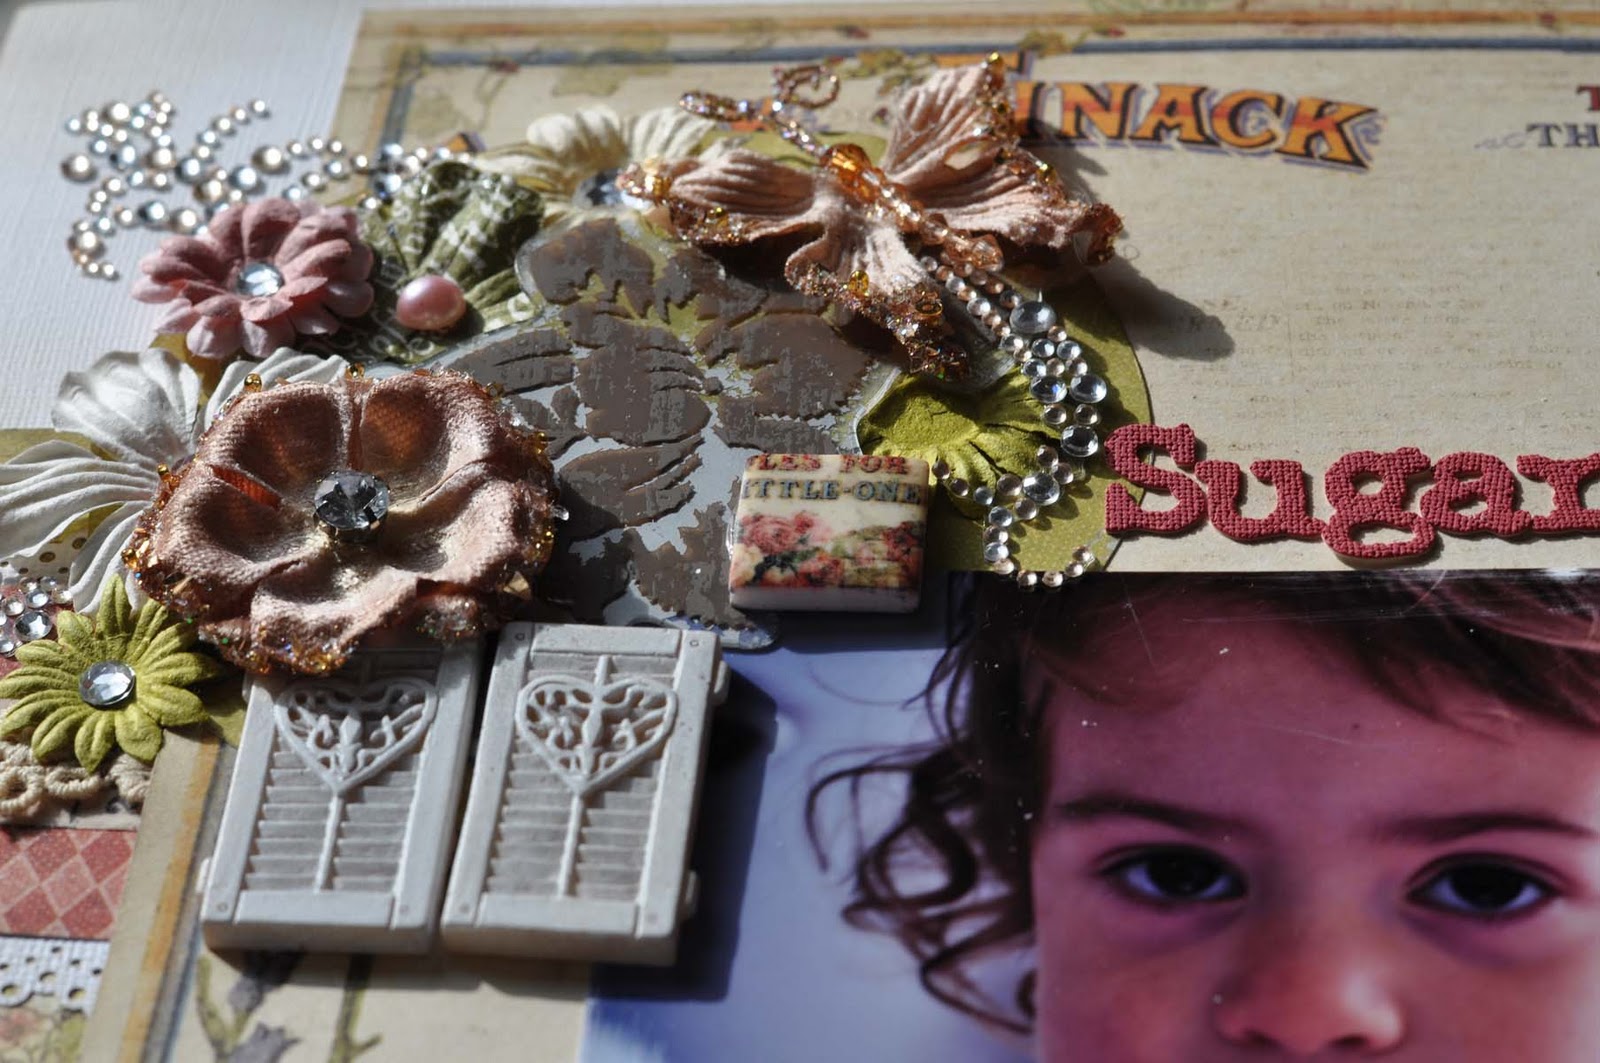
side I used Ranger distress ink and one of my Prima Masks for the photo mat, plus all the pretty Prima flowers.. I used several different flower collections, one being the Sunrise yellow Mini roses..
My big tag, same thing with ink and masking.. plus, I added some liquid pearl drops all over the place and Love the stamps I used.  

I also used some of the bigger Prima Flowers., the yellow Lilliput roses are amazing..
I also used Prima's floret collection-Camille, and these small roses are all made out of Mulberry paper..

I almost forgot, I had some transparency sheets and I cut one almost the same size as the photo mat, I folded one end of it and tucked it behind the side of the photo mat, stamped a big butterfly image on it and then added some punched butterflies plus a little blue Prima rose


I apologize that these photos are not in the right order, but I had such a hard time taking photos of this cause the pages wouldn't stay open.. I actually used a few of the clips to help pull the pages apart long enough to be able to snap a photo..LOL  so, I actually wasn't able to take the photos in order..
If you want to view a bigger picture, just click on the photo itself and that will make it bigger. .this way you can see all of the little details I added..

Ok.. whew!! that was a lot of photos to upload, but I'm in love with this mini and can't wait get go rummage through some of my daughters photos from when she was younger and add them in here or actually maybe, I will give this to her as a gift and she can add her own memories in it..Hmmmm!! LOL
I want to thank you ladies so much for stopping today and checking out my Monday post for Your Memories Here.. 
so, for supplies used that can be found at Your Memories Here:

Supplies from my own stash:
Chipboard, envelopes, liquid pearl, butterfly punch, leaves, chipboard letters,
hat pins, stamps by Stephanie over at Whimsical Designs, ribbon, clip, string of pearl, circle punch..

Hope everyone has a scrap-tastic week..
Hugs

January 29, 2012

A Cute Little Stool

Good Afternoon Blogland!

Today I am bringing you a cute little wooden stool that I I decided to alter.  I found this stool in Hobby Lobby after I dragged my husband there as payback for taking me to my first ever gun show!  I was wandering the aisles while we talked about life,guns and crafts and as I rounded the end of the aisle I saw the stool and the idea formed in my head.  I wanted to make sure I could get the supplies I would need so we walked a few aisles over and grabbed them.

 Now I have used lots and lots of products from Your Memories Here  There is also lots and lots of Prima Flowers and ribbon as well.
I started off by painting the entire stool with a Folk Art Seamist paint.  It matched beautifully with the Bo Bunny papers I had in my stash. I used a Tim Holtz stamp along the edges of the paper for the base of the stool and used my embossing pad so that I could highlight the stamping using Ranger Perfect Pearls. I love the slight shimmer they give to a project. Now anyone who knows me well knows I am so not a fan of embossing stamping or any of that stuff but I think it could grow on me...but shhhhh ok!  I broke out my Big Shot and used my gorgeous Tim Holtz birdcage die and got busy cutting. There was this amazing woman who had made a 3dimensional birdcage from this die and I saw it on Facebook a while ago (you can see her version HERE)...I knew one day I would make it and this week was my day. After I assembled the cage and got it inked with distress inks I topped it with some feathery Prima flowers.  Lots of hot glue and Glimmer Mist later...it was finished.  I have absolutely NO idea where I will put it but I love it all the same :)
 
That is all for me this week...I will be back next week with a project that my husband dared me to do...and no it is not another barn LOL!


January 28, 2012

The Most Wonderful Time of Year

The new release of craft products are about to hit the stores. I'm not even over the excitement of this past summer's release yet! But get ready to drool because these items are AMAZING.
Your Memories Here has been offering pre-orders of Prima's new products for the past 3 releases now, and our orders for them seems to be increasing with each subsequent year - Why? Because more and more crafters are finding out how SUPER AWESOME they are and WHAT A GREAT DEAL it is to purchase this way.
We started out offering "Grab Bags" of random all new products from the release in 3 sizes to work with your budget - these are perfect if you just can't decide which new line you love or just want a sample of everything that Prima offers.
Last summer we added the option to purchase a "Complete Collection" of products from one individual line. We're doing that again this year so that if you know what you want - you will get what you want because it is all clearly listed on the products page in our store.
So you choose which option is best for you!
Prima is promising to have these products out early to it's retailers (like mid February) which is good and not so good - Good, because that means you will not have to wait long at all for these wonderful new goodies. Not So Good, because that doesn't give you much time to get your order in. See we have to place our orders with Prima ASAP so that we are one of the first to receive these products (since they ship on a first come, first serve basis).
So please don't delay in placing your orders, we don't want you to miss out on this fantastic deal. The deadline for the Prima pre-orders is going to be February 2, 2012 - yep Groundhog Day for those of you who live in the U.S.

Also for a first time ever, we are offering a pre-order on a highly anticipated new product - Tim Holtz Distress Markers from Ranger!
37 markers in all the glorious Distress Colors that Ranger has to offer. Each marker is available to be sold individually and retails for $3.50 - but who are we kidding, you know you want them all? So we are offering the complete set with storage tube at a discounted price of $110 (and that does include shipping to the U.S.)
This offer will be good until February 15th - so you can ask your sweetie for the set for Valentine's Day :)
And lastly, each and every pre-order (Prima or Ranger) will receive a gift from me because I truly appreciate you choosing to shop with us.

January 27, 2012

This Moment....Your Memories Here

Hi everyone....Sandi here sharing with you  and I am feeling a little sad today as this is my last post as a designer at Your Memories Here. It has been a WONDERFUL six months and Kristina and the other DT ladies are some of the kindest, sweetest souls I have met in this awesome hobby. I am now working 2-3 days a week, along with my full time studies so I am limiting myself in terms of commitments. But I will continue to follow all their blogs and shop at Your Memories Here. I recently found an awesome challenge site called White With 1 and the you had to use lime green and buttons. I like challenges that limit my options because if not, just about everything in the scraproom is on the desk plus I have serious issues with details...cannot stop adding! This is my hubby and me taken on a little vacation. a few years back. I used papers from Pink Paislee and My Minds Eye and most of the embellies came from the Prima Grab Bag(flowersleaves, Chipboard title, resin window, Prima brickwall stamp)

I also used a stamp from Tattered Angels to stamp the post mark in the lower corner. I did the usual sewing and added lots of layers using cardboard, torn paper, cheesecloth and Websters Trim.
Well that's it for me....Take Care and Happy Scrapping!!!
Big Hugs
Sandi

January 25, 2012

Happy Wednesday


Hi everyone!  Today I wanted to share with you my latest project made with my Prima grab bag from Your Memories Here.  I still can't believe how many wonderful things I received in my box....and how many more I still have.

I love all the gorgeous goodies that my box had.  Papers, art tiles, butterflies, flowers, resins, trimsbling...oh my!  Here are just a few items for closer inspection.....
This box has given me so much to play with these past few months.  And yet, there is always more.  I am forever digging in to find more treasures.

That said....Winter CHA is upon us and Prima has released its sneaks of the lines.  And I can't decide which I must have.  So, I am asking you to help me.  Kristina is offering complete kits of each of the six new Prima lines in the store as a pre-order.  I think I have narrowed my choice down to these two...


What do you think?  Am I more an Almanac girl or a Nature Garden?  hmmmm, I so wish I could get both! hee hee  Be sure to check out both of these as well as the other four collections available for  pre-order at Your Memories Here.

Well, gotta run!  Be sure and leave me a comment with which I should get?  Thanks

Hugs.

Nancy

January 23, 2012

Valentine's Day cards-Project by Nanné

Happy Monday ladies...
Its NannĂ© again and I'm here to share with you a few Valentine's day cards I created as my Design Team project this week.. I got this cute Prima 6x6 stack called Sparkling Spring 

and I loved the soft flowery and spotted prints that were in there.. I wanted to create a few quick and simple cards and since Valentine's Day is just around the corner, I figured no better subject than that..LOL

so, here are my cards:

This was the first card I made. .Using the pinks and greens from the collection.. Hand made the rosette by cutting two strips of paper measuring 1.5" x 6", then using my paper trimmer and bone folder, I creased it every half an inch.. then used really strong adhesive to hold the ends together and easily was able to create a cute rosette..
for a few close ups:

did some computer generated journaling, which I then hand cut into little banners.. MS punch for the butterflies and liquid pearl drops..

and then for second card.. I used the same paper collection which is the Prima Sparkling Spring 6x6 stack.. I'm telling ya, I'm going to be creating a lot of cute little projects with this stack, cause its packed with paper..
For this one, I used the greens and dark pinks.. plus some of the flower prints..  Distressed the edges and made another rosette to match.. this time cutting three strips of paper instead of the two, I prefer this rosette better, folded a lot easier as well :)

for a few close ups:
I inked the edges with distress ink and punched a few circles for the center.. adding some liquid pearl to accent..
Another computer generated sentiment, which I once again just hand cut onto strips of scraps I left over from the other card.. plus I punched a few butterflies and the lace trim..

for supplies used on these two projects:
Your Memories Here store:


from my own stash:
white cardstock, cuttlebug and embossing folders, liquid pearl and MS punches

well ladies.. thats my Monday project for you.. hope these cards inspired you to make some of your own. 
I want to thank you all so much for stopping by today and having a look at what I've created..

Hope everyone has a scrap-tastic week..
Hugs


January 19, 2012

Snow Princess

Hi everyone....Sandi posting today a little bit early because I wanted to post this layout to the SOUS Challenge using Nanne's gorgeous sketch. Alot of the goodies you can find at the Your Memories Here Store.Here is Nanne's sketch:
I used some Prima flowers, lace, Resin bird house and nest and the Tattered Angels Architectural Stamps. The kraft paper is from Tim Holtz's resist papers.

I was lucky to find a Martha Stewart Snowflake punch at Walmart for $3. I punched  out the snowflakes and then layered some of them back with pop dots and covered with diamond dust to give them a frosty look.
And just a few more close-ups

I made the bling leaves and the paper flowers.
That's it for me so be sure to check the YMH store and have an AWESOME weekend!

January 18, 2012

Mixed Media and Goosebumps


Hi everyone, Nancy here!  I hope where ever you are today you are warm and dry.  I know that many parts of the country are experiencing crazy weather.

I recently decided to start an art journal.  I began with a simple watercolor notebook I picked up at Michaels with my coupon.  I covered it with some scraps of older Prima watercolor papers that I colored with my Glimmer Mists and other Prima paper scraps.  I added bits of fussy cut butterflies, tons of rub ons, and a few pieces of chipboard.  Inks and paints blended it all together.  My Claudine Helmuth multi-medium keeps it all in one piece.
The first super fun technique I decided to try was using my Goosebumps Texture Spray from Tsukineko.  On the cover I used it as a resist.  This was so fun, and easy.
  After placing my papers I layered my mask and sprayed the texture spray.
I continued on with different paint mediums until I got the look I liked.  Sorry about the photo, but I forgot to take one before the whole cover was finished.  You know, once you get going.....
I found that the Goosebumps gave my paper a fun, waxy like appearance, so I tried just spraying this little card from my grab bag papers with it directly.
 And here my card is with the resist applied.
 On the first interior page I once again used the Goosebumps as a resist.
 The technique was the same as for the cover.
 I found I need to hold the mask down securely and to spray evenly if I want a nice resist.
Lucky for me I wasn't too worried.  hee hee
Well, I am sure there will be lots more to share in the coming weeks.  For now tho...my niece wants the computer and if you have ever had a two year old in the house...I am sure you understand why I need to go.

Stay warm and safe.

Hugs.

Nancy