June 29, 2010

Time Flies When you are Having Fun

I can't believe that June is almost over.  It really is amazing how fast the summer is flying by.  I think the days just rush by faster in the summer.  Is it due to the longer days, the amount of free time to do whatever you want now that school is out?  Whatever it is, I am sad to see June go, as that means my time here at a guest design team member comes to an end.  I would like to leave you, however, with one last layout I did.

My children are all swimmers, so a lot of our summer is spent at the pool, at swim meets.  And swim meets mean waiting.  If you have never been to a swim meet, you probably didn't know this....but while the meet may last for 6 hours, each swimmer spends maybe 3 minutes in the pool.  Yep, that is a lot of waiting.


The SEI Mimosa papers were so summery, they fit these swim photos perfectly. I cut the larger flower shape, large flower and ring using my Cricut.  A bit of Glimmer Mist in Pashmina and Sunshine on the chipboard flowers gave a bit of sparkle.  Finally a few Tear Drops to accent my larger flower and I was done.

It has been tons of fun working with all the lovely products from the Your Memories Here store this month.

Hugs.

Nancy

June 28, 2010

Beautiful Butterfly Resist


I played with a new Prima Stamp set called "Wings" and decided to do an emboss resist to create my pattern. I started by stamping the frame in Versamark and sprinkling it with gold embossing powder and heating it. Once that cooled I embossed the two different butterflies with Versamark and sprinkled white detail embossing powder and heat set that. Then I used a sponge and Tattered Rose and Broken China Distress ink to bring out the resist. I added my ribbon embellie which has a Prima flower and leaf and stamped my sentiment. This is such a fun technique that you should try if you haven't and if you have, should play around with again:) Thanks for stopping by!

June 26, 2010

Design Team Call

Hello All, Hope you are having a fabulous, fun filled weekend! I was whisked away yesterday on an emergency berry picking mission. Some of you may know that my husband's hobby (one of many) is wine making. Well, it's raspberry season and the best wine making berries are wild and must be picked when they are super ripe, just before the birds get them. Well, our source for wild raspberries is about 3 hours away on my parent's property. So anyway, that's what I've been up to. Which means, no crafty project to share with you today.

I do want to remind everyone that there is a DT Call going on for YMH Designs (this blog).
Please visit this post here for all the details.

For all of you that have already submitted - Thank you! for your interest. Your submissions are fabulous and it's going to make our decision really difficult. But that's a good thing, that means our team is going to be so AWESOME!!

For those who are thinking about submitting - you still have plenty of time, and we'd love to see what you've got!

June 24, 2010

DT- For the Family Scrapbook Layout

Today, I'm sharing a layout I made for pictures that I'm very excited about. A friend of mine is a photographer who takes amazing pics & I asked if she would take some pics of my family. Because I'm the only girl in the house, I had to make a layout that would be masculine, but have those pretty, girly details too without being way girly. I think I did just that :)
I turned to the beautiful Windsor Collection by SEI. I used 3 papers from this collection for my layout. I used the Home Accents cart to cut out the title on my Cricut & that's popped with micro pop dots. I kept the embellishments simple. To create the center embellishment, I punched out circles from the paper & crumbled them up & just layered them---> so simple, but it created a perfect -not too girly- embellishment.  I pulled the gold color from the gold foil found all throughout the papers.
Here are a couple of closer peeks at it.
top half:
 bottom half:
 Thanks so much for peeking!
Be sure to stop by the YMH store to get your hands on the SEI collection used for this project. This is one collection you will not be dissapointed with!
Gotta Go!

June 22, 2010

Diary of a Dancer's Mother.

It is so hard to be the mom of a dancer and a scrapbooker.  The ballet doesn't allow us to take photos inside the theater, or backstage; so I am left with photos of my daughter holding her flowers after the performance.  Since this would probably be the only photo I had to document the event, I really wanted it to be a special one.


The teardrops lent just the right amount of sparkle to the page, while the small circles cut from SEI Mimosa papers  contrasted nicely with the outfit she was wearing.  I used a snag-em stamp for the date.  The layout was simple yet really highlighted my photo.

Thanks for coming by.

Nancy

June 21, 2010

Easter LO


These were the pictures from this past Easter. It was the first year we colored eggs and hunted for them with my mom at her house and started a new tradition, which I'm so happy about. Of course the kids had so much fun and are looking forward to next year. I used some of my favorite Primas and Dew Drops and the Easter Cricut cartridge. For my title I just cut off the "happy" and only used the word "Easter" as it was already welded for me. I hope you are having a good Monday:)

June 20, 2010

Hello everyone and happy Father's day hope you all have a wonderful day.

This week I have 2 cards to share with you, just in time for Fathers Day.

I made these cards for my Husband and Dad. I used SEI papers from the Windsor 12x12 Paper Pad; the colors and patterns are great for masculine cards. I also used the Pearls from the Pearls and Crystals - Biscuit;My cricut to cut out Dad, and Premium Ribbon Assortment - White.


Happy Father's Day

To all the Dad's out there, Happy Father's Day!
For my husband, I made a real simple card (cuz he's a no frills kind of guy)
This card shape was cut on my Cricut using the Wild Card cartridge. The paper is from the SEI Moravia paper pad and it is AWESOME for masculine cards! This paper has flocking on it (though you can't tell in the photo) it is fuzzy to the touch along the cream colored stripes. The solid blue frame around the cut out window is also part of the Moravia paper pad. I just love how all the papers coordinate in the paper pads! I attached the blue frame with some copper eyelets(they seem like a "masculine" fastener LOL) The sentiment is stamped inside and peeks through the window in the front of the card.

June 19, 2010

Your Memories Here Design Team Call

Your Memories Here is an online paper crafting supply store. We specialize in products to enhance your creativity. In our store you will find luxurious papers, embellishments that have glamorous sparkle, natural inspiration or whimsical fun. Whether you are looking for shabby or chic, modern or vintage we have something for you.
We also have a blog for inspiration ( You are here) We are looking for some designers to promote the products Your Memories Here offers.
To be a designer for Your Memories Here you need to have your own blog and will be required to post once a week on both your personal blog and the YMH Designs blog a project featuring products that can be found at Your Memories Here. We also have a face book page and a group on Paper Craft Planet that we’d like you to post to. If you belong to any other forums or message boards and can help spread the word that way, even better! The design team term will be for 6 months (August - January)
What does Your Memories Here have to offer you? How about product samples and product discounts?!
While we can’t afford to give you all the materials for all of your projects (wouldn’t that be nice) We will send you packets of product samples every other month for you to incorporate into your projects to use with your own stash of supplies. We also offer you a discount on any product you wish to purchase from Your Memories Here.
This call is open to everyone everywhere around the world. Scapbookers, card makers and mixed medium/altered art artist are all welcome to apply.
To apply:
Send an email (please put YMH DT Call in the subject line) to krissy@yourmemorieshere.com and include:

  • your name and where you’re from
  • at least 3 examples of your work
  • blog address
  • short bio (so we can learn a little about you)
  • a list of any forums or message boards you belong to.
  • Please visit YourMemoriesHere.com so that you are aware of the products we sell and let us know if you currently own any of the products we offer.

The call is open from June 19, 2010 till midnight July 11, 2010. We will announce the Design Team on July 18, 2010. Which will give us plenty of time to get out your first package of product samples to you so you can start creating for your posts in August.

June 18, 2010

Love Card

Hello everyone! Samantha here with a love themed card for you.  This card was inspired by the love sentiment on the Jubilee Font Cartridge. This cartridge is available in the YMH store for only $35!! That is an awesome price for a cartridge!!


I cut the sentiment at 1 and 3/4inches with the Real Dial Size ON and then I cut out the heart on the same size with the Real Dial Size turned OFF. The red heart actually just fit right inside the brown heart for a neat little outline.

DT- Father's Day Wallet

Hi everyone!
Today I'm sharing a really quickie wallet (made in under 10 minutes) for the hubby for Father's Day.
Here it is:
 and the inside:
What makes this so quick is using the gorgeous Bridgeport CS papers from SEI. This is my other fav go-to guy papers. This paper is a little more elegant looking with gorgeous patterns, flocking, & foiled designs. I cut the beautiful Monogram with my Cricut (with my beloved Gypsy) using the Tie the Knot cartridge.
Yes, I'm adding more cash than $2 (hee! hee!) Hey, this is a collector's 2 dollar bill here! (wink ;) I just haven't been to the bank yet :)

Thanks for peeking today & be sure to stop by the YMH store for the supplies for this project.

June 15, 2010

Girlie Card Fun

I truly am a girlie girl. I love all things girlie. Pink, flowers, polka dots, lace and ribbon, and anything glittery. That is one of the reasons I was so thrilled to be asked to be a guest designer for Your Memories Here this month. And how fortunate I was that I have so many of my favorites to play with this week.

I started with a simple white card with a cut edge. I used a die, but you could easily use a punch, shaped scissors, or free hand a shape. I turned a scrap of paper from an earlier layout into a spiral flower. I added a pearl to the center of the flower for interest. If you are not familiar with making these flowers you can find directions here. I used a bit of Glimmer Mist to color the ribbon to match the card. It is a very simple process. I spritzed some mist onto my craft mat and rubbed the ribbon around until I got the desired color. A mini coral rose, a stitched sentiment, and my congratulations card was ready to mail.
I also needed a gift card holder for a friend who has really helped me out these past few weeks. I decided a little purse card would be just the perfect shape. More of the beautiful, glittery Mimosa papers from SEI were cut to form the purse. Another mini rose, and a handle made with the beautiful Prima trim finished the card nicely. Inside is a little pocket made from a scrap that easily houses a gift card. What could be more girlie than that? hee hee

Hope you have some fun today.

Nancy


June 14, 2010

Just Paper and Embossing...

And a little chalk made up this little card. No patterned paper here! The Cuttlebug embossing folders are defintely some of my very favorite crafting tools. I love how easy they are to use and how much texture and visual intrest they add to a project. Here I've used the Moroccan Screen and Birds and Swirls, which I colored with some Pastel Pebbles Chalk. The label was cut using the Damask die and embossing set. Be sure to check out the shop and pick up a few new folders to use in all your projects, and come join us over on Paper Craft Planet, Your Memories Here has a new group and we need more of you fabulous crafters to come join us:)

June 13, 2010

pretty princess

It's Sunday again...wooowhooo! I must start this post with an apology for posting so late

Today I have a pretty princess layout to share with all of you.....I made this layout for my Daughters Disney pics....I just love the way this layout came out. I used lots of prima flowers,prima ribbon and imaginisce fairest of them all collection castle stamp, rub ons and rhinestones from imaginisce baby mine collection


complete layout


Prima Flowers Sweet and Sassy - Clueless, Sweet and Sassy - Princess.


Castle Snag 'em Stamp


Lace Ribbon - Cream Braided Rose

June 12, 2010

Photo Display

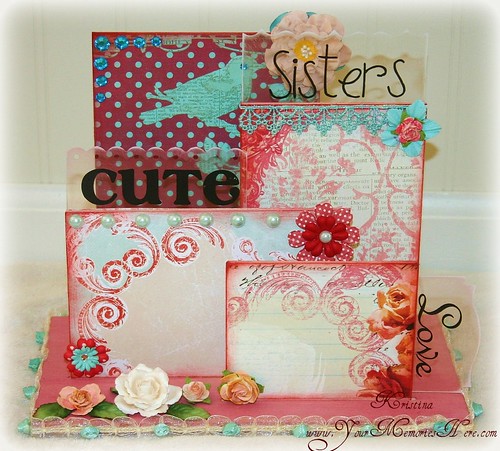
I made this photo display for my Grandma's birthday present (too bad her birthday was June 3rd and I just got this finished on Monday...oops) But she lives pretty far away from me and I won't be able to give it to her until we have a visit anyways.
photodisplay
Before I give it to her I'll add some photos of my girls to it.
The display itself is from Kaisercrafts' beyond the page line. It is made of MDF and I painted all the surfaces that aren't covered with paper with some cream acrylic paint. Then I went over the base with Tim Holtz fired brick distress ink.
The papers are all from the Prima Shabby Chic line. I just love the mix of the red and aqua colors. I glued the papers to the display pieces with Mod Podge and they are covered on front and backside in case she displays this somewhere that the back will be seen.
photodisplay16 I inked all the edges with more of the distress ink. The beautiful embellishments are Prima flowers, Prima pearls and crystals and 
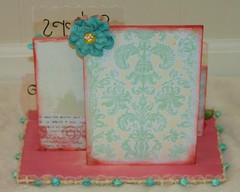
Prima ribbons. The clear words are just printed on transparency sheets on my printer and then I cut them out and used my Tim Holtz Alterations edge dies to give them a decorative edge. I added a little white Staz-on ink so that they stand out a little more. The largest display (the one with the bird paper) has been sprayed with some Glimmer Mist to give it an aqua color with some shimmer. Also the rose ribbon trim that goes all around the base is Prima ribbon that I colored with the Glimmer Mist by dabbing each rosebud with a paint brush dipped in the Glimmer Mist.
I think that covers all the details but if you have any questions I'll be happy to answer them.
Of course you can get the Prima products at Your Memories Here:)

June 10, 2010

For Dad

Hi everyone!
Today I have a Father's Day card that may go to my hubby or my FIL. Don't know yet. Usually, I make a few & have my boys pick out which one Dad gets & which one Pa Pa gets. Anyhoo, here it is:
 The Deets:
All of the DP I used on this card came from the Monrovia Collection by SEI. This is my go-to guy stack. They're cardstock weight papers *perfect* for masculine projects. The papers are gorgeous (as all SEI are in my opinion :) They're foiled & flocked which adds the perfect touch of texture & shimmer without being glittery or girly. I used 4 of the papers in this collection & I think they go very well together. I also used my beloved Gypsy to weld the image & the letters together on my Cricut. I used the A Child's Year cart (luuuuuuuv) for the image & the font. 

Thanks so much for peeking! Don't forget you can find the supplies used for this card (on sale!) at the YMH Store---> HERE.
Gotta Go!

June 9, 2010


Here is a $1 box that I bought at the craft store and covered with paper. On the front I used Prima lace. I used hot glue to attach it to the front of this cute box and mini I made. I think this Prima lace added the perfect touch to the front of this cute little box. You could add a small gift or trinket or make a mini as I did. So head on over to www.http://yourmemorieshere.com and go shopping for the perfect embellishments for your projects.

June 8, 2010

Sassy

First off, let me say how thrilled I am to be the Your Memories Here guest designer for June. I love the store, so many great items.

Well, some of these great items I put to use on this layout of my daughter.


SEI Mimosa papers, Two Lips Tear Drops, Prima Mini Rose in Coral, and a Snag-em stamp on a background of Glimmer Misted cardstock worked perfectly with this sassy photo of her. And yes, she is quite sassy.

The flowers were super simple to make, and added a fun and festive look to this project. I simply cut circles out of the patterned paper and then cut straight toward the center of each to make the petals. A bit of scrunching and a rose center and I was done.

Hope you have a sassy day!

Nancy

June 7, 2010

2 Cute

I did a little play on words for this LO as the picture was taken when my daughter turned 2, and I do think she's pretty cute ;) More Prima goodies on this one, my lace trim and rosebud ribbon are both Prima and so are the flowers. The title was cut using my Cricut and Lyrical Letters and the scalloped circle was cut using the Easter cart. Of course I had to use the pretty Dew Drops for my flower centers and for a few extra accents. I hope you had a great weekend! Thaks for dropping by!

June 6, 2010

I'm Back

Hello Friends,

Well finally I'm back it feels wonderful to get back to crafting after a lot of crazyness. Today I have a sweet Thanks A Bunch card I made to share with all of you
For today I have a simple card I made using the Mini Rose - Bright Purple from YMH. (24 pieces per bag with 3 color variances Mini rose size (excluding stem) approximately .75" diameter with 2.5" long wire stem. Made of high quality mulberry paper.)


Front of card


Inside card

June 5, 2010

June Guest Designer

Hi everyone, Happy Saturday Morning!

Sorry I'm posting this a little late (the holiday weekend was crazy busy and I was out of town)
Our Guest Designer for the month of June is Nancy ! She'll be posting every Tuesday this month (except last Tuesday). If you can't wait till next Tuesday to see some of her work you can visit her blog HomesCool, her layouts are amazing!


I'll be back later tomorrow with my project post (Linda's taking a little time off)

June 4, 2010

Birthday Chickie Card

Hello everyone! Samantha here, bringing you another chick card for today!

I was inspired by this Snag 'em stamp that I got from Your Memories Here. I was trying to think of the BEST way to jazz it up and make the stamp shine. Well this is what I came up with:


Isn't he just the cutest little thing?! You can find him in the YMH store here: Bird Snag 'em Stamp . I love his bling eye and patterned look.  I actually stamped this stamp THREE TIMES, one on whisper white cardstock, one on the yellow patterned paper and one on the pink cardstock.  Then, I cut out the yellow layer and the pink layer and then stacked them all together.


Paper piecing is a great way to make your stamping look amazing!!

June 3, 2010

Hey there, Chickadee

Hi everyone,
 Here's a sweet little card using one of my fav techniques: paper piecing.
 Sometimes, I don't feel like coloring an image so I'll paper piece. It's a great way to "color" your stamps & add pops of colors & patterns to your stamped images.

For this card, I used a smidgen of DP from the Bridgeport Collection from SEI. I stamped the cute birdie Snag 'em stamp on 3 different papers & cut them out. I stamped again & cut out just the belly & the wing & mixed the DP for more contrast on each birdie.  Very simple :) I added a Prima Mini-Rose which went perfectly with the colors of the DP.

All these goodies can be found at the YMH Store---> HERE. Thanks so much for peeking!

June 2, 2010


Here is the front cover of my junk journal that Im working on. I used this big Prima flower. It was white and I used my shimmerez in pink to color it. I also used Prima bling in pink as well behind the flower and on the front cover of my jumk journal. So head on over to www.yourmemorieshere.com for all your Prima products to make your projects sizzle.