March 30, 2012

Song of the Sea Configurations Box


TGIF! Dana here today. It's finally warm enough to enjoy the beach and I couldn't be happier.  I had a blast altering this beach themed Configurations Box. Configurations are dimensional shadow boxes made from 1/8" wrapped paper board, not thin chipboard or paper mache. These sturdy covered boxes are inkable, paintable, and best of all configurable. Available in four sizes, each configuration comes with a framed lid with a removable acetate window.


Measuring approximately 2" deep, each configurations can be used to display your most dimensional elements, mini books, and better yet, they fit the curio knobs and foundation feet like a dream! Stand them up or lay them flat, you decide how to display it.


I lined the back of each box with patterned paper from the Tim Holtz Idea-ology collection.  The seams and edges of this box are covered with Tim Holtz Tissue Tape.  Be sure to stop by the Tim Holtz Idoa-ology section of the Your Memories Here Store!


As a reminder, there are still spots available for Sweet Retreat! This is an event you don't want to miss. There will be exclusive classes and projects that you can't get anywhere else, plus tons of fun, food and special surprises.  If you want to join Your Memories Here, have lots of giggles, sweets, and craft with the gorgeous girls from Prima and our very own Kristina, go HERE and grab your spot! 

March 29, 2012

Art Journaling with Ranger

Hi there! Last week got away from me with a showing. It's HARD work getting this house ready for strangers to come look around. I hate that part. Still no offers so I'll keep crafting til I have to pack it all up. :(
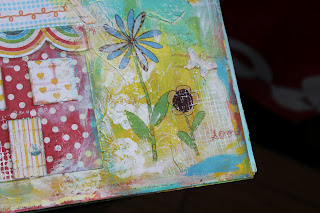
 Today's post is an art journal layout that I started late one night and wanted to use some of the Ranger Distress inks in different ways. I have 2 layouts to show you. Here's the first one:
 I stamped with the Distress ink and applied it straight to the stamp with the dabber. You could dab some out on a craft mat and add water then use a paintbrush to apply it.
 I used Ranger Crackle Paint in broken china in the sky. It adds awesome texture and lets other mediums ooze into the cracks. Love it! I used the Ranger Liquid Pearls to add the little dots behind the butterflies.
 I also added color with the dabbers straight to the page. I of course painted the background first then added all the fun stuff on top. The inks add great dimension and highlights.
 The colors are SO fun! The inks are so versatile and the one step crackle paint.. I mean come on! You need to get at least one to play with. It's a very opaque color too. Except for the rock candy, it's clear. :)
 I'm not quite done yet. I need to add some words and stuff. I usually try to keep my pages pretty flat because I work on the backs too. So, buttons and things like that are fun.

 The butterflies I punched out of Prima paper and then used the dabbers and applied the spun sugar and broken china. It's pretty transparent so you can add a little color or layer it for more. Of course I added some sparkle with the Ranger Stickles. I dabbed it out on my craft mat and used my finger to rub it on.
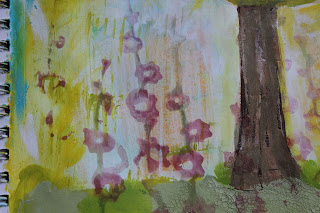
 This is the next page in my journal. I used Ranger crackle paint on this too. I used broken china, brushed corduroy, and shabby shutters.This is the first layer of probably 47 so I'll let you know how it turns out.
 I used the Prima Donna Downey stamp and dabbed on the color straight from the applicator right onto the stamp. I uses the peeled paint for the green and then used both spun sugar and fired brink for the flowers. I was messy when I applied the color not worrying too much about it blending and then stamped. I stamped the image about 3 to 4 times before the image was faded away. Cool!
 I also used my fingers to dip into the crackle paint and rub it on in places. You can get a thinner layer that way. However using the applicator included gives you thick lines with deep crackling. SO cool. The inks applied directly to the stamp gives you a great watercolor look, like the script stamp I did above with the broken china.
Well I hope you enjoyed my pages. I'll post the houses one on the FB page when I'm completely done. DON'T forget to check out the Sweet Retreat info!! Spaces are still available!! 
Happy Creating!
~Kimberly

March 28, 2012

Wednesday


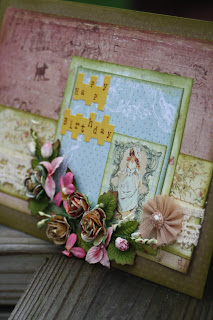
Hi everyone, Nancy here with a quick card I made for my nieces third birthday on Monday.

I tried to keep it super simple by using my Londonerry A4 paper from Prima.  I love that the backside of the paper is white, so I didn't need to use a liner.  I added a few Prima roses and little snip of a Prima bling flourish.  A few Authentique letters for my sentiment and a tiny Prima butterfly accented with a bit of stickles and I was done.

Don't forget you can still sign up for the Sweet Retreat from Your Memories Here.  I am just crushed that I probably won't be able to attend since airfare is so expensive from California, but if you are in the area.....

These kits are only available from the Sweet Retreat, they will not be taught in any other classes in the US!  

Hugs.

Nancy


March 27, 2012

Capture the Memories...


Hey y'all! Hope those of you who had spring break last week had a great time! Me, well it just seems like we were so busy I got further behind...lol! I didn't get a thing posted last week and hope you don't hold it against me. I think all of us get busy with family and a little flustered from time to time! ;0) But right now, it's time to have some fun with Your Memories Here and my card that I whipped up this week - using, of course, some Cosmo Cricket! I never get tired of their product, as you all know, and YMH has seriously cute & seriously cheap paper collections you can snag. You can check out all the Cosmo Cricket goodies YMH has to offer RIGHT HERE!


Supplies
Cardstock - The Paper Studio
Ribbon - May Arts
Scallop Punch - Stampin' Up
Adhesives - Glue Glider Pro, Pop Dots, Aileen's Fast DryTacky Glue


I've been in such a spring mood lately - the weather here in Oklahoma has been absolutely gorgeous for weeks - and it's really inspiring my creations. I've another bright and fun project coming up in a few days if you'd like to visit my blog HERE. In the meantime, make sure to visit the YMH Store HERE to get some great deals on some amazing products like Cosmo Cricket, Tattered Angels, Prima and Ranger!

I also want to remind y'all that the Sweet Retreat is coming up soon & you know you don't want to miss it! You will have an amazing weekend of fun, friends and sweet food - not too mention getting to create some fabulous projects with some top Prima educators. So visit HERE to get all the information and get ready to get crafty! Until next week, Happy Craftin'!!

March 26, 2012

A little Prima goes a long way

wow!! Another Monday :) 
I have a love/hate relationship with Mondays..LOL
 I love Mondays cause I get to share a project with you all that I create as my design team project for Your Memories Here but I hate it since it comes right after Sunday, my relax and create day..LOL
but anyhow.. let me share a little layout I created using some of Prima's Sparkling Spring papers.. This layout measures 12x12 but I used papers from a 6x6 stack.. love that I don't have to waste paper by using the smaller sheets..

Here is project:
I started off with a piece of 12x12 white cardstock.. Grabbed one of the masks from Prima 8x8 mask set.. placed it one the cardstock and took some Spun Sugar distress ink and an ink applicator and started rubbing ink all over the edges, then added small drops of white liquid pearls to accent the masking.. creating what I'd like to call a pretty cool frame around the photo mat..LOL

I also attached string of pearl with Helmars Gemstone glue..love that stuff, dries absolutely clear.. 


I also added some Prima flowers and leaves. accenting it all with some Prima Say it with Pearls.. 


All right then fellow scrappers.. That's my Monday project for this week.. I know last week I promised a video of my finished mini album which I had posted photos of the last few weeks, but I haven't had a minute alone to make it..So, I will try my hardest next week on my day off to get that video created..


I want to thank you all so much for stopping by today and checking out my design team project for Kristina over at Your Memories Here.
Hugs


March 25, 2012

WOW!! Sunday again...

Yep it is Sunday again and I am running behind...again!!  Today saw us catching up with our family for all the March Birthdays.  Our family birthdays are predominately in March and April..so instead of multiple get togethers we pick one date for each month and gather to exchange gifts and eat yummy cake!!
 Also it meant I can now share one of the cards I made using the Prima Romantique line.  This card I made for my Mother In Law. I do love the soft colours to this line and the ease of which it all goes together so nicely! I inked the edges using Tim Holtz Distress Inks. I am loving the Prima Alpha packs with all those choices...oh my it makes it hard but I have yet to not have a letter I need either lol!

The craft studio is coming along nicely too...the carpet was laid this week and now it is all about finishing touches.  I get my new bar stools this coming week *fingers crossed* and then once I have everything moved in there will be a reveal of photos.

Also dont forget there are still spots available but it's coming up soon. This is an event you don't want to miss. We will have exclusive classes and projects that you can't get anywhere else. Plus tons of fun, food and special surprises. So if you want to join us and have lots of giggles,sweets oh and crafting with the gorgeous girls from Prima and our very own Kristina ..go HERE and grab your spot!!

March 24, 2012

We're Moving!

...Our stock room that is. Because it is so much easier to change locations without having to move a ton of product too we're offering an incredible, never been done before (by us) deal!
If you love Prima flowers this is your lucky day!
Pictured above is over $150 worth of Prima products. We have an array of items left over from Live with Prima kits, as well as new released products from  the past Summer CHA.  There are even discontinued items that you can not find any where any more! We have found things that we simply forgot we had!
And to save us the trouble of moving it all to our new stock room we are going to sell it off in a bulk grab bag for only $75! Your box of goodies may not look exactly like the one pictured here, but it will be just as awesome!
We hope to sell out of these quickly - so hurry up and get yours!
****Updated to add that we are now offering these grab bags in 3 sizes/prices $75, $50 and $25

March 23, 2012

Laughter - Prima Meadow Lark Collection


Dana here today sharing a soft and simple page I created with the Prima Meadow Lark Collection.  The soft pastel color palette of this collection is really beautiful.


My two favorite embellishments from this collection are the Alphabet Stickers and the Wood Buttons.  There are 693 pieces in the Alphabet Sticker package, which includes 4 fonts in four different colors as well as word stickers.  There are 18 pieces in the package of Wood Buttons.  Each button has a different design and is either a circle, flower, star or heart.


I always love the flowers!  The Lucerne flowers add a wonderful subtle shimmer to projects as they are pre-glittered.  There are 12 multi-colored flowers in a package, which makes this package of flowers perfect for use with each of the patterned paper in the Meadow Lark Collection.

If you love Prima flowers be sure to check out the YMH Prima Flower Sale. Your Memories Here is offering Floral Grab Bags in 3 sizes for $25, $50 and $75. Each Grab Bag includes items from leftover Live with Prima kits, newly released products from Summer CHA and discontinued items that you can not find anymore! These Grab Bags are selling quickly, so hurry up and get yours before they're gone!

March 21, 2012

Old + New =


Hi everyone, Nancy here!  Last week I received my grab bag from Your Memories Here.   I couldn't wait to jump right in and play!  Of course I was a little leery cutting into all these new packages, so I mixed some of my older Prima Papers and products with a few of the newer.
Supplies Used: Prima Papers; RomanceAvondaleAshton, Prima Resist Canvas; Prima Flowers, Prima LaceDistress Inks; Tumbled Glass, Worn Lipstick, Wild Honey; Prima Say it in Crystals; Prima flowers
 
I gathered a mix of old and new flowers to form my flower cluster; varying the sizes and colors for interest and depth; and added more resist canvas and some Prima Say it in Crystals.
On the canvas pieces I used multiple colors to add dimension.

I hope you are having a great day!

Hugs.

Nancy

March 19, 2012

Family Vacation Mini - YMH dt project

Happy Monday fellow crafters..  I started a family vacation mini a few weeks ago and have been show casing the pages every Monday as my design team project for Your Memories Here..

I'm loving this Windsor stack  (its on sale by the way) I got from YMH, it has some amazing papers inside, most of them are embossed with golds, browns, blacks and purples.. plus, I don't have to worry about coordinating cardstock cause it comes with that as well.. Making my job a whole lot easier :)..

I got the cover done yesterday and just went a little crazy with the gold stickles..LOL 

I cut a piece of clear plastic that was actually a cover to one of my paper stacks, what a way to recycle..
I then took a stamp and some black ink, stamped on the edges with a floral print.. covered the middle with some of the paper from the Windsor Collection, found the chipboard title in my stash of goodies, added some purple hydrangeas, little white roses and green leaves.. final touches, I added some drops with gold stickles and some Prima E-Line gems..

For the first pages on the inside: 
For this page I added some of the big roses that came in my Prima Grab bag, plus some of the mini purple roses, which accented nicely with the bigger ones.. I also added some leaves, which I dabbed with some gold paint.. I did stamp the edges of the pages with and edge stamp: Architectural Trims by Tattered Angles. which I then added some white pearl drops to accent them..

for this page, I added some journaling tags which I have written on, but since I'm not to happy with hand writing, I will keep them hidden..LOL  Here you can see more of the mini roses, leaves and the stamped trim.


After we were on the road for two days, we finally reached out destination. Dubuque, Iowa..  Our kids were so tired but we got them up early so we could head off to meet their relatives.. I once again used the purple hydrangeas, white mini roses and leaves.. I also used E-line pearls for the middle of the flowers..

and finally this is one of the last pages I have done (for now), still have a few to go.. and yes, my daughter is flicking me the bird..LOL  I kept telling her to smile at the camera, remind you this is about 6am after we drove for two days from Florida to Iowa.. She wasn't very happy..LOL  I covered her little gesture with a chipboard sticker..LOL    My boys are on the little clear acetate sheet I added in the middle.. 

All right then fellow crafters, thats my Monday post for this week.. Do stop by next week and I'll have a video walk through of the whole finished album.. 
Thank you all for stopping by today and checking out what I've been creating..
Hugs

March 18, 2012

STOP the World...

I want to get off preferrably at an exotic island location!!  Please??  LOL

Well it is Sunday evening yet again and I have not even attempted to craft this week...though I have a perfectly good and wonderful reason.  For those who dont know, we have been finishing our basement over the last 3 weeks.  It has been an all consuming process for both my husband and I.  We both work 50 hours a week plus all the time we have put into the basement getting it all ready.  We have framed, drywalled, sanded, painted and stained more then I thought humanly possible but we are seeing the end.  They come to lay the carpet on Tuesday and then it will all be *almost* done!
 So because I dont have crafty goodies to share, I am going to share my brand spanking new craft studio with you.  Everything has been done at my request which makes it even nicer I think.   I chose kitchen cabinets as they are deeper and generally have shelving as well as being able to support 10' long counter tops. The first photo is the view from the staircase, this was as the cabinets were put into place and before they were painted...yes I painted oak cabinets (I think my husband was horrified!)
 
 The next shot is from the base of the stairs looking towards the counter where my computer will live.

This is how the cabinets now look with a coat of paint...looking closely you an see the woodgrain pulling through the paint.


This cabinet will have a sink put in it once the plumbing gets completed so I will have somewhere to clean up all my paints and brushes :)

  This week I also received happy mail from Kristina...I bought the clearance grab bags of Prima goodies...so I filled a draw...(well 2 actually but shhhh dont tell hubby!)

Today has seen me starting to relocate my craft supplies to the new studio...it is a very long tedious process and one I am not liking very much at all LOL! This week will see the arrival of my new bar stools and then I can start creating downstairs.  I can hardly wait for that!

Keep an eye peeled next Sunday for the project I have up my sleeve...it is something I have had swirling in my mind for a while...until then have a fabulous week!