Hi everyone! Are you ready for the weekend? I had a great week with some awesome kiddos at VBS but a break from all the action sure will be nice too.
So as the title suggests, I want to talk to you about Ranger Distress Stains by T!m Holtz. They are going to be available very soon and I wanted to get everyone's thoughts on what colors you will want the most. I'm even willing to bribe you for sharing this information with me ;)
So here are the colors that will be available, what's on your must have list?
Your Memories Here. Deadline to submit your answer is Monday, August 1st.

July 29, 2011
July 27, 2011
Distress Inks and Water Stamping
Hi everyone. Nancy here and today I have a simple technique, water stamping. You will need your distress inks, a blending tool, your stamp, embossing ink, and your project, here I chose to use a tag.
 Ink the tag with your ink blending tool. Remember, add more ink to get bolder, deeper colors.
 Apply embossing ink to your stamp. This will help the water stick to the image. Mist your stamp with water and press firmly onto the inked background.
 As the image dries, you will see it start to fade.

I am using this tag for a birthday present. I added some gorgeous Marion Smith Vintage Trinkets, a simple Prima flower, and a bit of a Prima flourish as well as a few scraps of paper to my inked and stamped tag.
Thanks for stopping by.
Nancy


I am using this tag for a birthday present. I added some gorgeous Marion Smith Vintage Trinkets, a simple Prima flower, and a bit of a Prima flourish as well as a few scraps of paper to my inked and stamped tag.
Thanks for stopping by.
Nancy
July 26, 2011
Write This Down...a LO featuring Prima's Road Trip collection!

Hello again my crafty peeps! So glad to be back to share with you another LO I whipped up using some more amazing Prima products from the Your Memories Here Store. I am really liking Prima's Road Trip line; it has been just perfect to scrap our recent Fourth of July trip to the lake with friends.

I absolutely love hanging out on the pontoon boat with everyone. At one point, when were heading back to our campsite, everything was just so peaceful on the lake. It was just a perfect moment & I didn't want to forget it. So, I took a photo of my feet kicked back & relaxing, watching the waves that went on for miles. It was hot, but there was a great breeze blowing & everything just felt...right. So that's where this LO came from, my need to "write this down" so I could always remember it!

Supplies
Red Tiny Type - Cosmo Cricket
Red Stitched Chipboard Letters - American Crafts
Adhesives - Glue Glider Pro, Pop Dots, Aileen's Fast Grab Tacky Glue

Thanks so much for stopping by y'all! It always totally makes my day! I also hope you'll stop by the YMH Store & check out all the fabulous products that are offered, especially the super awesome Prima Marketing goodies. Also, I'd be just tickled pink if you stopped by & visited my blog HERE too. See y'all next week and in the meantime, Happy Craftin'!

July 25, 2011
Had Enough of CHA?
Since CHA was so last week and most of the products that were reveal won't be available to purchase until next month sometime are you tired of all the CHA talk? or do you still want to know what to see some more of what's to come?
Well, while we're talking about things that are happening right now, let me remind you of what's going on here at Your Memories Here:

Well, while we're talking about things that are happening right now, let me remind you of what's going on here at Your Memories Here:
- We're having a giveaway for some Paper Crafts magazines (that ends tomorrow)
- Today is the last day to enter to win the 900 facebook fans giveaway
- There is a coupon code to save 20% off of all Helmar products at Your Memories Here with the coupon code HELMAR
- Today is the last day to place your pre-order for the soon-to-be released NEW Prima products.
- Today/Tonight (depending on what time zone you are in) there is a Live with Prima class featuring Julie Fei-fan Balzer the "Technique Geek". It is on Prima's Ustream channel at 8:00pm eastern (which is 7pm central, 6pm mountain, 5pm pacific)
- Also tonight is a Live Helmar class 1.5 hours after the Prima show on Helmar's Ustream channel (9:30pm eastern... etc.)
This it the toilet in the Chicago O'Hare airport. I found it interesting that it automatically has a hygienic cover on it for you :) Just wave your hand over the top it it changes it out for a fresh new one. Potty Magic is brilliant!
July 23, 2011
Inspiration Overload
Hi everyone, I'm back with more photos of the gorgeous project samples from CHA. They really spark a creative urge to just go make something!
 The brick wall background on this canvas was created by using the Prima brick mask and modeling paste, then colored. The shutters and window are also new Prima resin accents.


 This mini album was made using the new 6"x6" mulberry papers and the cotton writers tape for the spine. I am in love with that curly feathery flower!

 This canvas bag album is not a new product (it's available now) but all the gorgeous adornments on it are!

 There's that feathery flower again ;) This time on a canvas album that was sprayed with mists over one of the new Prima masks to give the gate image in gold. The lamp post is one of the new metal accents from Prima too.
 I have many more photos I could share but I wouldn't want you to go into inspiration overload! Well, OK, just one more -
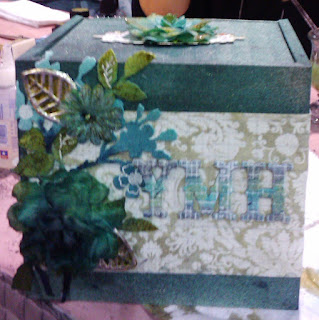 This is the wooden box I made at the Tattered Angels make-n-take. It is covered in glimmer mist and embellished with the resist papers from Pink Paislee, the new canvas resist vines from Prima and gorgeous flowers, all glimmer misted and glimmer glammed!
You can always visit the Prima blog if you need to get your creative fix :)
So do you think you NEED some of the new Prima product? You can Pre-order it now from Your Memories Here with one of our very budget friendly offers:
 We have grab bags with an assortment of all new Prima products in 3 sizes/prices -
Small - $70 worth of product for only $50 shipped!
Medium - $100 worth of product for only $70 shipped!
Large - $160 worth of product for only $125 shipped!
These boxes will begin shipping late August to early September. But this price is only good until Monday July 25. After that all products will be regular retail price.
If you like to have more control and would rather choose your products, we have another option for you:
 Choose the collection you want!
You pick which new Prima collection you want to purchase and we'll pre-order all of it for you (please see product listing for everything that comes in the collections HERE).
You will receive over $85 worth of product for only $70 shipped!
Again this offer is only good until July 25 and then prices will go up.
So what is on your must have list?
These are all from the Prima Design Team using their soon to be released products:


You can always visit the Prima blog if you need to get your creative fix :)
So do you think you NEED some of the new Prima product? You can Pre-order it now from Your Memories Here with one of our very budget friendly offers:
Small - $70 worth of product for only $50 shipped!
Medium - $100 worth of product for only $70 shipped!
Large - $160 worth of product for only $125 shipped!
These boxes will begin shipping late August to early September. But this price is only good until Monday July 25. After that all products will be regular retail price.
If you like to have more control and would rather choose your products, we have another option for you:
You pick which new Prima collection you want to purchase and we'll pre-order all of it for you (please see product listing for everything that comes in the collections HERE).
You will receive over $85 worth of product for only $70 shipped!
Again this offer is only good until July 25 and then prices will go up.
So what is on your must have list?
July 22, 2011
Shiny and Bright
At least on my card, lol. One of the many blogs I read is Amazing Paper Grace by Becca, and on it I have seen her tutorial on creating a pleated background. Ever since I saw it I have been wanting to try it out. Now was my chance I decided. The card is much larger than I usually do (it is 5 x 7), but I think it would look great framed too (guess that means it could be a gift and a card, nice). The paper I used for it and the stip the ribbon and stars are on came from a Tattered Angels kit from Your Memories Here. I followed the directions as well as I could, but had a little trouble with getting it to stay for me as I was going around. Once I got the pleats where and how I wanted them I added some Helmar's 450 to the inside edges to help insure the pleats would stay in place and place a couple of my ink pads on top until the glue dried just in case. While that was drying I went to word on the light blue layer. First I inked up a music stamp from WMS's Musical Backgrounds set with Versamark and then brushed some Perfect Pearls "Perfect Pearls" over it to give it a nice subtle shine. Then I used the largest die from the Labels 14 Nestie set to cut out and emboss the center. I used some foam dots to get the depth I needed for it to lay flat over the pleats. To cover up the part that doesn't have pleats I used a strip of paper that was left over from cutting out the strips for the pleats and layered a white sheer and grosgain ribbon over it. To cover the center of the pleats I used the Star Nesties to die cute and emboss some stars (they were also used for the strip with ribbon). I decided I needed some sparkle for my stars so I coated the center one with Tattered Angles Glitter Glam Chandelier and then added a little glitter (the glam acts as the glue and holds the extra glitter so well). Over that center star I punched out the circle and sentiment from WMS's Seasons of Love set (after I had embossed them in white). On top of that I layered the smalled star from the Nestie set and coated the center of it with some glossy accent. To spruce up that layered strip I sparkled up another star glued it down. It still looked kinda plain so I layered another star that I not only die cutted out but used a smalled star to get the center out and embossed. I left this layer plain so break up the sparkles some. I thought I was done, but as I was getting ready to snap a picture of it I decided at the last minute that it just needed more sparkles. I cut up some Prima Say It With Swirls and used it as a tail for the star. I LOVE how it turned out. I also sponged the edges of the light blue paper as well as the paper strip with several shades of blue Distress Ink and the navy blue base with some white ink.


Now comes the question, do I give it away or keep it in a frame for myself...


Now comes the question, do I give it away or keep it in a frame for myself...
Subscribe to:
Posts (Atom)