

December 29, 2011
Did Santa Treat You Nice?
Did you get what you wanted for Christmas? Did you get to spend time with family and friends? Well in case there are still somethings left on your Christmas wish list we want to make it easier for you to get what you really want (no, not a rice cooker) Crafty Goodness!
Free Shipping on orders of $45 or more AND from now until the end of 2011 and extra 15% off your entire order with coupon code GIFT15
December 28, 2011
Gone, but not Forgotten
Hi everyone, Nancy here. I know the Christmas holiday has passed, but before we go too far, I wanted to share with you a quick project I did using a few fun products from the YMH store.

A few weeks ago, I saw Tracy from Helmar glitter the inside of a glass ball using the Hemar V2 Vellum Spray and thought I would give it a try. I had a few clear glass balls lying around, and my youngest wanted to make a special gift for her cousin. I sprayed the inside of the glass ball with the adhesive (the ball gets cold, be careful) making sure to get good coverage. Then I dumped in some glitter. Handing the ball over to my daughter, she swirled the glitter around inside the ball until we had good coverage. After dumping out the excess glitter, we got to the fun part....decorating.
 A few Prima flourishes, a couple of flowers and my trusty Scrap Dots and we had a beautiful ornament. My youngest was so proud to show off her handiwork.
Thanks for stopping by.
Hugs.
Nancy

A few weeks ago, I saw Tracy from Helmar glitter the inside of a glass ball using the Hemar V2 Vellum Spray and thought I would give it a try. I had a few clear glass balls lying around, and my youngest wanted to make a special gift for her cousin. I sprayed the inside of the glass ball with the adhesive (the ball gets cold, be careful) making sure to get good coverage. Then I dumped in some glitter. Handing the ball over to my daughter, she swirled the glitter around inside the ball until we had good coverage. After dumping out the excess glitter, we got to the fun part....decorating.

Thanks for stopping by.
Hugs.
Nancy
December 21, 2011
Small Gift Giving
Hi everyone, Nancy here! I hope you are having an amazing holiday season. Here at my house we are in full swing preparing for Christmas. Two sets of grandparents arrive today, the children have completed their semester's work and there are only a few days left till the big day.
I have been crafting like crazy to try and get all the handmades done. And you know the children always have a few last minute requests for friends and coaches. Eeeek
Here is a request I finished, a gift holder and coordinating card. I used lots of Prima goodies from my Grab Bag from Your Memories Here (can't wait till spring to see what my next box holds. hee hee).

The little posy can be filled with yummy holiday treats, or even a gift card.
For the card I used some Prima Vines and paper from my box and some older letter stickers from My Minds Eye. After inking the Prima Writers Tape with some Distress Inks, I used a bit of Stickles to brighten and add a bit of sparkle. The posy was made by forming a simple cone and then embellishing with lots of flowers and another vine. I used a bit of lace to make a handle for the posy. I even managed to sneak a little more sparkle in by lightly spraying my tissue paper with a bit of Glimmer Mist. (be careful here, too much water and the tissue will start to dissolve.

Well, lots to do, lots to do.....See you soon!
Hugs.
Nancy
December 20, 2011
Christmas Centerpiece by Sandi
Hi everyone...Sandi posting to day to share a Christmas centerpiece using Prima goodies that you can find at the Your Memories Here Store. I have been looking at Pinterest for inspiration and found so many pretty ideas using epsom salt.

I couldn't find any so I just used coarse salt mixed with glitter. I first stamped plain white candles using Staz On ink and my script stamp. I then coated the candles with very generous coating of Mod Podge and rolled in the salt/glitter mixture. I then added the Prima branch, butterfly and poinsettia flower.


I used a plastic plate that I bought at Walmart for $2.50 as my base and added a few pine cones and branches. Here is a close up of the candles because I wanted you to see how shimmery they are.


Well that's it for me until after Christmas. I just want to wish you all a Merry Christmas and a Wonderful New year!
Hugs
Sandi
December 19, 2011
Seasons Greetins from Nanné
Happy Monday once again ladies and its only 6 more shopping days till Christmas..LOL I'm done shopping for my kids for this year which is great, usually I'm one of the late comers..LOL

and a few close ups:

You can create one of these cards by selecting a few products that can be found right here at Your Memories Here..
supplies used:
from my owns stash: brown cardstock, gold trim, string of pearl, leaves, ribbon, gold paint dabber and title
I want to thank you lovely ladies for taking the time out of your busy schedules and stopping to take a look at my DT project for this week..
Hope everyone has a Very Merry Christmas
Hugs

December 14, 2011
A Quick Little Mini
Hi everyone! Nancy here with a quick little mini album to highlight a few of my favorite photos of my niece. (which I still need to add)

I can't wait to find some cute photos to add to it. And you know, I will be adding lots more flowers and other embellishments.
Hugs.
Nancy
December 12, 2011
Holiday Card-Prima
Happy Monday again ladies...
Its Nanné again and I want to share this cute and easy holiday card I created using some of the Prima Printery papers and some Prima bling..
Here is my card:

Its a 5 x7 card, I cut out of white cardstock.. Then I layered different colors of white and black Prima Printery papers, that I got in my Prima Grab Bag.. distressed the edges with my edge distresser and finally, I cut six triangle shapes out of white cardstock, punched the edges with my MS edge punch and inked them with Ranger Distress Ink, Finally adding some Prima Say it With Crystals in green on some of the branches.. layered the tree with Helamar Zapdots to give it some dimension.. Gold ribbon is from my own stash.. cute, quick and pretty simple..LOL

Close up of the tree..
I will be making lots of these for different projects cause it really was that simple :)
I am loving my Prima Goodies and can't wait to make more of these cards for my family and friends..
For supplies used that you can find right here at Your Memories Here:
Prima Goody Grab Bag
Prima Say it with Crystals
Ranger Distress inks
Helmar Zapdots for dimension.
from my own stash: Gold ribbon :)
I want to thank you all so much for stopping by today and taking a look at a quick and simple card I created.. I hope I have inspired you to grab your favorite primas and get crafting..
Hope everyone has a scrap-tastic week..
hugs
Hope everyone has a scrap-tastic week..
hugs
December 9, 2011
Christmas Tag
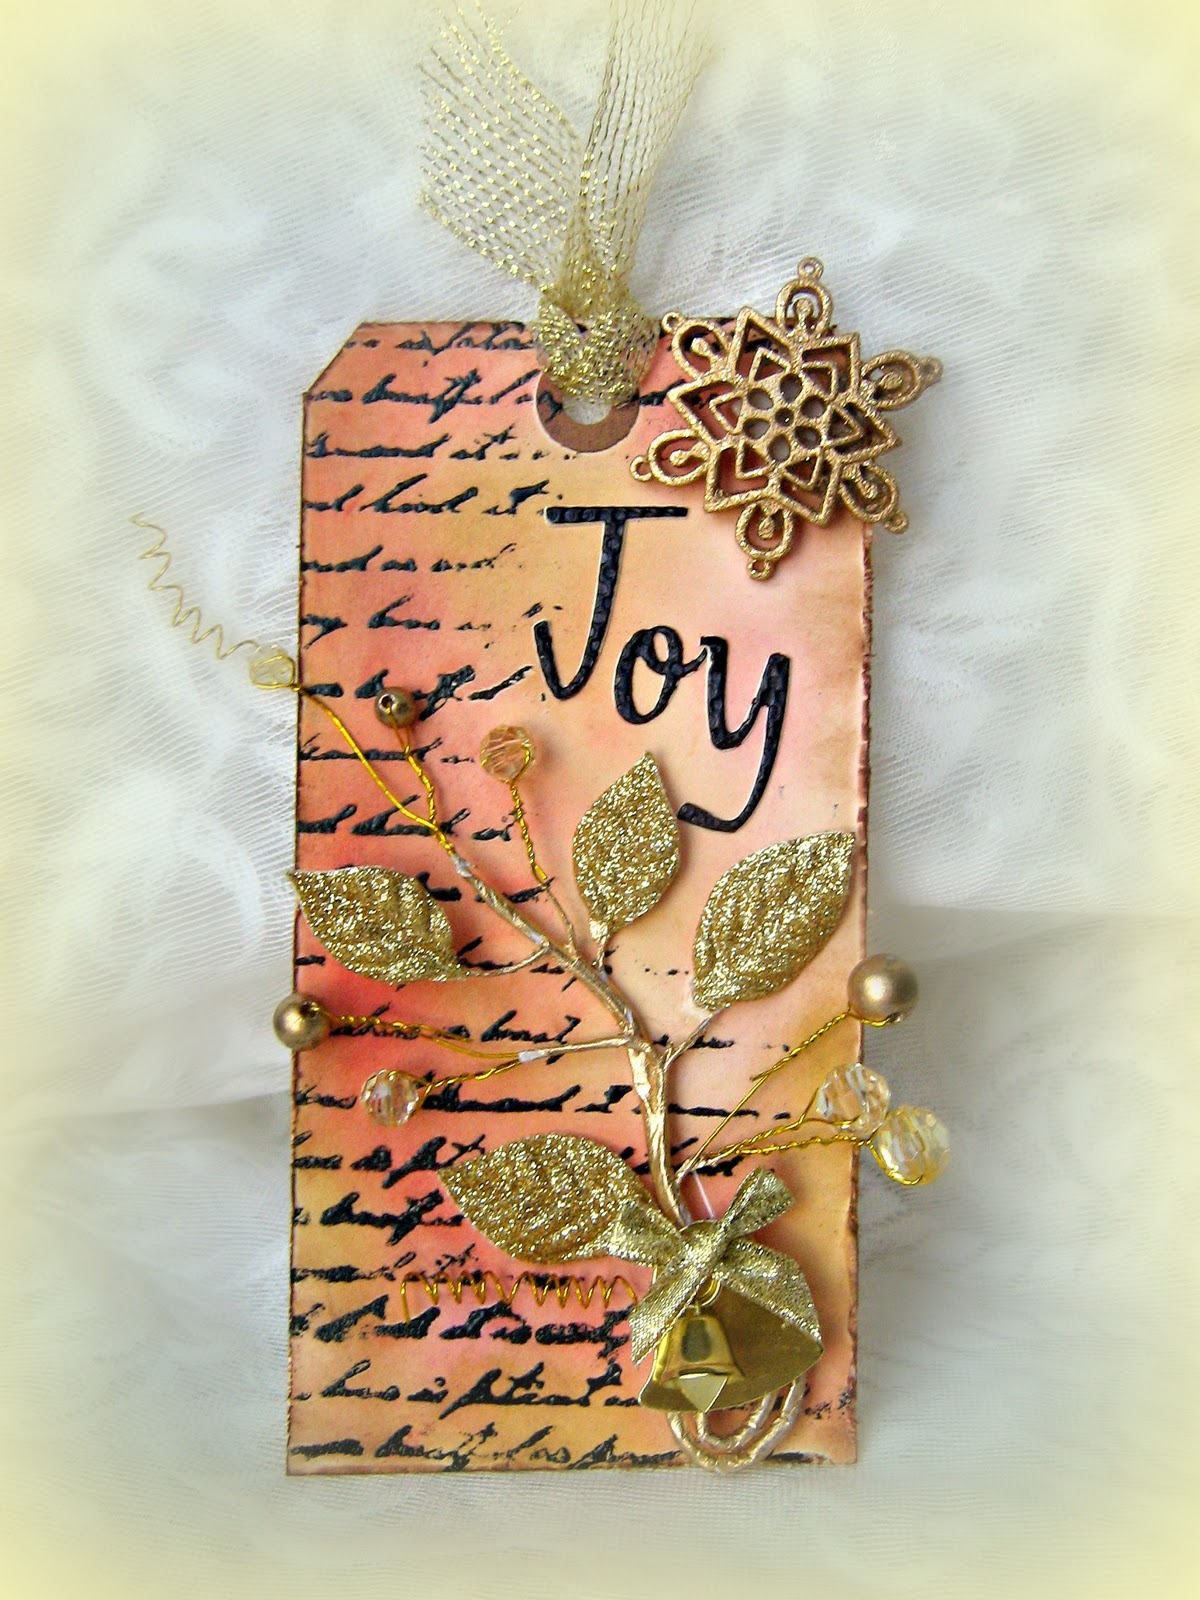

The beautiful branch is from Prima and the snowflake and little bell were bought at the Dollar Store.

Sandi
December 7, 2011
Happy Wednesday
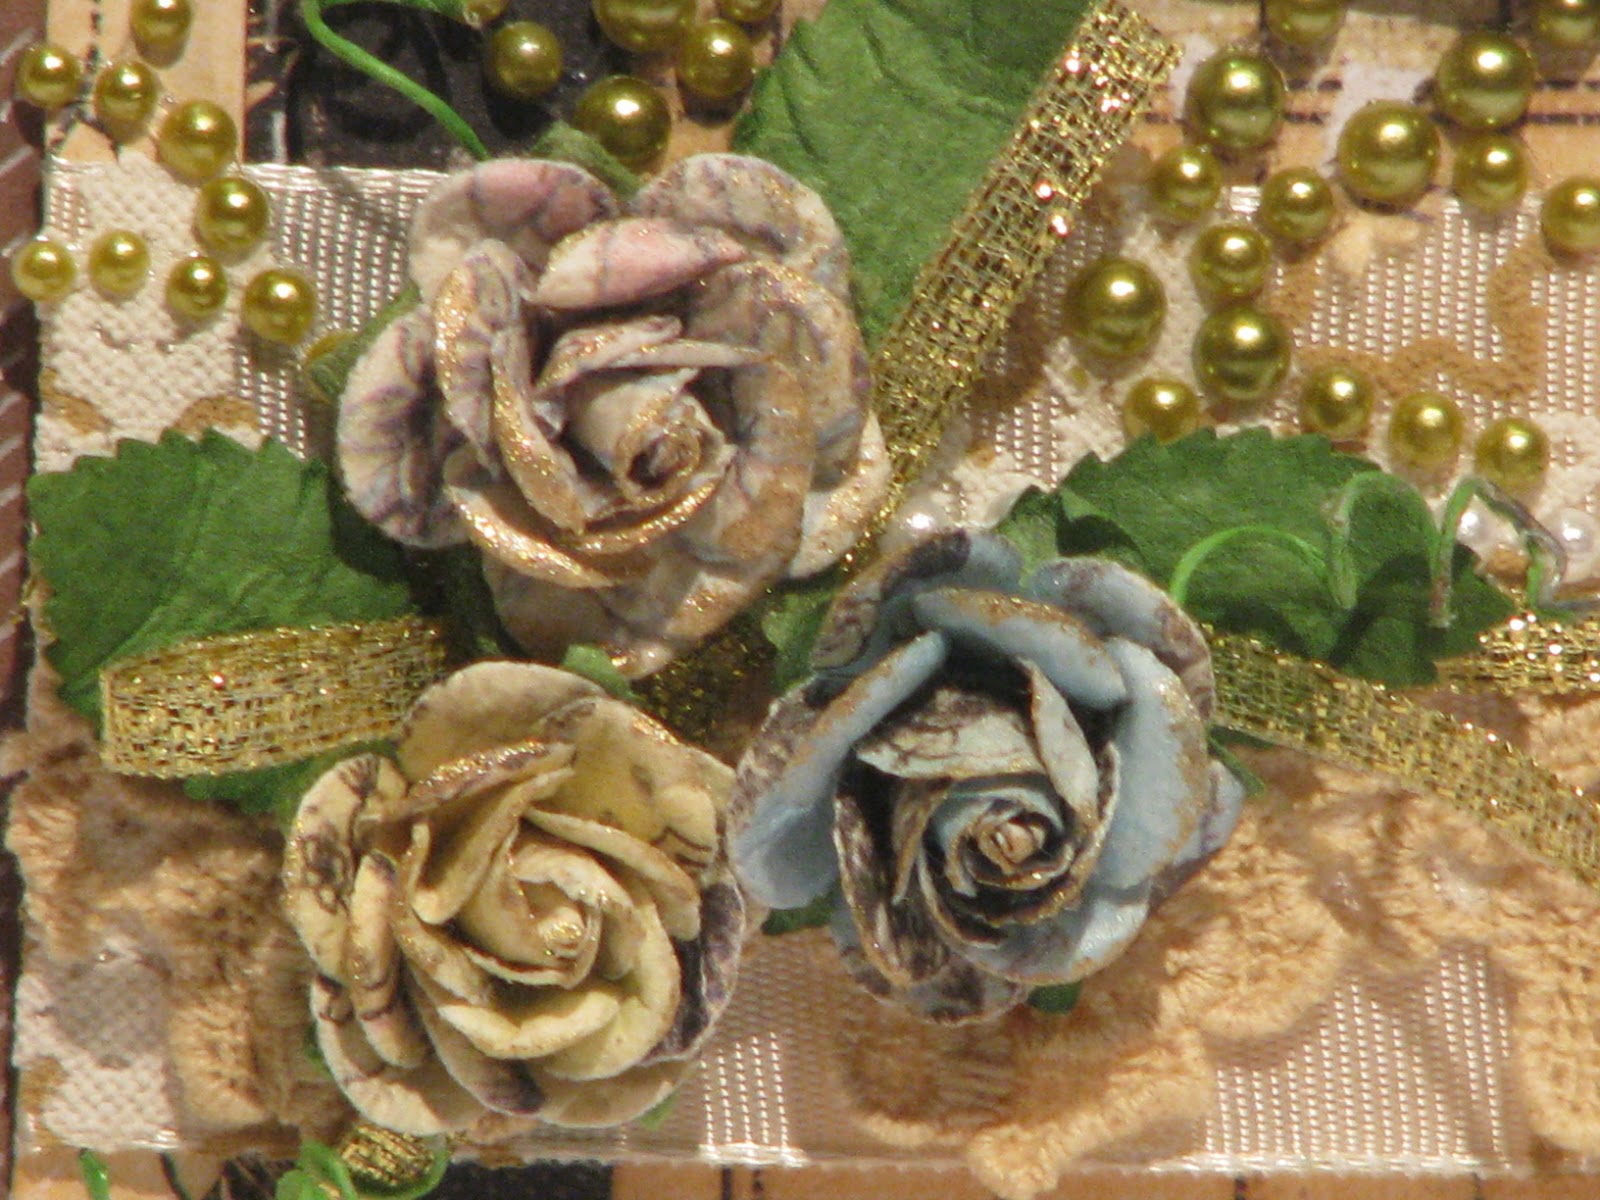
Hi everyone, Nancy here today to share with you a layout I made with my grab bag of Summer CHA Prima goodies. In my bag there was a tube of the Pixie Glen Essentials flowers. The colors were gorgeous and worked beautifully with the Random Collection from Crate Paper for this layout.
 I added in a bit of Ruby Violet flowers. The enameled flowers added such an interesting texture...
 And of course I cut up a few Prima flourishes to go with the pearl and jewel centers. I even added a little resin birdhouse in the corner.
Well, got to run. Hope you are having a great day.
Hugs.
Nancy
 |
| Patterned Paper, stickers Crate Paper. Prima florals, bling, resins Prima. Hero Arts/Sizzix stamp and die cut, Cricut Doily |
There were so many flowers in this tube I think I hardly made a dent. I used my Cricut to make the doily behind my photo and added a bit of lace I had from the YMH store.


Well, got to run. Hope you are having a great day.
Hugs.
Nancy
December 5, 2011
Inspired Tags..
Hi ladies, its Nanné here and I wanted to share a little something with you that I created..
I know you've seen Tim Holtz tags for his 12 days of Christmas tags..Well I was beyond inspired and wanted to do a little something other than a card or layout, so I grabbed some cardstock and a few supplies and created two tags Tim Holtz style. :)

These are both cut 4x6 from white cardstock, that I inked with several shades of Ranger Distress Inks, then stamped them with a Tim Holtz Visual Artistry stamps..
for this first one, I chose pinks and blues..

I randomly stamped an image on the base of the inked cardstock, then punched out some snowflakes using my MS punch, added some fuzzy trim, Prima flowers (Whisper collection)and Prima Mistletoe.. The base of the title is a Prima Reistant Canvas, which came in my Prima grab bag, the title I cut with my Cricut Imagine in white , then added some adhesive and white Micro Beads, plus some Prima Eline pearls to the middle of the inked snowflakes.. These really are glimmery and shiny, but the inside lighting just didn't do them justice, sorry about that..
finally I punched a hole on to the top of the tag and added some pink ribbon..
and then for the Blue and white tag:

once again, I rubbed the tag with Distress ink, then stamped the diamond image using Ranger Embossing Ink and white embossing powder, heat set it.. stamped a filmstrip image onto white cardstock which I again used Ranger Embossing ink and Ranger distress embossing powder in rust.. heat set that as well.. rubbed some vintage photo ink all over the edges and then folded it up and glued it down to the tag.. I found this Prima flower in my stash, the twigs and leaves are a die from Tim Holtz. The snowflakes are a MS punch, which I once again added some Prima Eline pearls to .. The top note and title I cut with my cricut, sprayed the title with Tattered Angels Frosty Glimmer Mist and glued that down onto the tag using Helmars quick drying glue.. whew!! a lot of work..LOL
I finally rubbed the top corner down with some white liquid pearl and then added drops of baby blue liquid pearl to the diamond stamped image..
I had so much fun making these tags.. You can too with just a few choice supplies from right here at Your Memories Here..
I can't wait to put these tags to some good use, maybe on a card or even a layout.. super fun and easy..
thank you ladies so much for stopping by today and checking out what I created for my DT project for today..
Hope everyone has a wonderfully creative week!!
hugs
December 4, 2011
A Quick Card
Happy Sunday Bloggers!
The weeks are flying by as we fast approach Christmas and I am finding myself in more of a panic as each day passes. I have not done a single bit of Christmas shopping and I have to grab a few things to add to the package that is being sent back to Australia arrgghh!!
 For today though I have a simply made card that went with the mini album from last week. The papers were from my stash of Pink Paislee and I loved the soft vintage look to these papers. I have inked the edges with two different Distress Inks from Ranger. I added the green lace trim from Prima and some cream scalloped lace I had in my stash. LOTS of gorgeous new Prima Bling
and the final touch was to use the Tim Holtz die to cut out the flower. I adhered everything using Helmar's 450
The card was well received and I loved the finished item. I have done quite a few projects this past week but sadly I can not share them until after Christmas as they are gifts for family and friends...so once January arrives....there will be much sharing of items.
Hope you all have a great week.
The weeks are flying by as we fast approach Christmas and I am finding myself in more of a panic as each day passes. I have not done a single bit of Christmas shopping and I have to grab a few things to add to the package that is being sent back to Australia arrgghh!!
 For today though I have a simply made card that went with the mini album from last week. The papers were from my stash of Pink Paislee and I loved the soft vintage look to these papers. I have inked the edges with two different Distress Inks from Ranger. I added the green lace trim from Prima and some cream scalloped lace I had in my stash. LOTS of gorgeous new Prima Bling
 and the final touch was to use the Tim Holtz die to cut out the flower. I adhered everything using Helmar's 450
The card was well received and I loved the finished item. I have done quite a few projects this past week but sadly I can not share them until after Christmas as they are gifts for family and friends...so once January arrives....there will be much sharing of items.
Hope you all have a great week.
December 3, 2011
Altered Box..
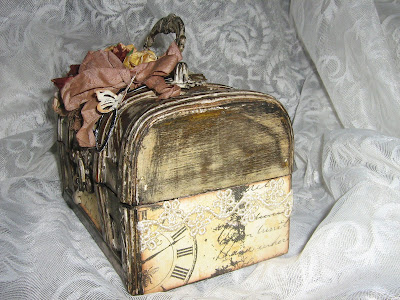
Hi everyone...Sandi here today to share an altered project I have been working on. I bought this little box at the Dollar Store and I loved its distressed look.Most of the goodies came from the Your Memories Here Store and some from my stash.

I used papers from Prima's Printery Collection but aged them a bit more used Distress ink in Vintage Paper.I also used lots of beautiful Prima flowers, leaves, Bling and trinkets.

I dyed the seam binding and cheesecloth with Glimmer Mist in two colors(Decadent and Oriental Poppy. I used my Martha Stewart Butterfly punch and Prima packaging for the butterfly. Here are a few more pics:


 Thanks so much for looking and be sure to check out the store. Enjoy the rest of your weekend!
Sandi

I used papers from Prima's Printery Collection but aged them a bit more used Distress ink in Vintage Paper.I also used lots of beautiful Prima flowers, leaves, Bling and trinkets.

I dyed the seam binding and cheesecloth with Glimmer Mist in two colors(Decadent and Oriental Poppy. I used my Martha Stewart Butterfly punch and Prima packaging for the butterfly. Here are a few more pics:


Sandi
December 1, 2011
Wow it's really December already? Yep it snuck up on me. I knew it was coming, I even made plans for it but just saying it - admitting it's here makes me feel like there is so much to do in soooo little time.
The one thing I have been looking forward to for the first day of December is Tim Holtz's 12 Tags of Christmas.

Even if you aren't into that style (distressed grunge) you can still find some ideas and inspiration in his tags - not to mention great tips and techniques that you can apply to you own projects.
Since this is kind of an impromptu post for me (I'm filling in for Cassie) I didn't prepare a project for you. But that doesn't mean I don't have something to share :)
 I created this tag over the weekend. I plan on making more, similar ones with my daughters to put on Christmas gifts.
For the base I used kraft card stock and stamped script all over it with a background stamp and some dark brown ink. The rest of the papers are from last years DCWV "Handmade Christmas" stack. The little bird is from the Tim Holtz Bird and Cage Sizzix die. I made the rosette and adorned it with a couple of buttons from my stash. All the edges are inked up with Distress ink in Scattered Twigs ( I just might like that color better than Vintage Photo!) All of these elements are held together good and strong with Helmar 450 Quick Dry.
My friend Cari has been making some gorgeous tags (and I'm so going to be using her ideas too) She's even going to be teaching them on a Live with Prima Class next week! So are you going to make some tags too?
The one thing I have been looking forward to for the first day of December is Tim Holtz's 12 Tags of Christmas.
Even if you aren't into that style (distressed grunge) you can still find some ideas and inspiration in his tags - not to mention great tips and techniques that you can apply to you own projects.
Since this is kind of an impromptu post for me (I'm filling in for Cassie) I didn't prepare a project for you. But that doesn't mean I don't have something to share :)

For the base I used kraft card stock and stamped script all over it with a background stamp and some dark brown ink. The rest of the papers are from last years DCWV "Handmade Christmas" stack. The little bird is from the Tim Holtz Bird and Cage Sizzix die. I made the rosette and adorned it with a couple of buttons from my stash. All the edges are inked up with Distress ink in Scattered Twigs ( I just might like that color better than Vintage Photo!) All of these elements are held together good and strong with Helmar 450 Quick Dry.
My friend Cari has been making some gorgeous tags (and I'm so going to be using her ideas too) She's even going to be teaching them on a Live with Prima Class next week! So are you going to make some tags too?
November 30, 2011
Kissing Ball
Hi everyone, Nancy here with a fun holiday project for your home.
As I am sure you know that when you step under the mistletoe you are inviting a kiss; but did you ever wonder where the tradition came from? Like many of our current traditions, this one comes from the middle ages, but was updated during the reign of Queen Victoria. I found a detailed story here if you are interested, but here is an excerpt....
 I used Festive Berries from the LE Winter Distress Inks to color each flower from the Prima Wildflowers Pillar. (a handful of flowers was all I needed.)
 And then spritzed them with a bit of Dazzling Diamonds Glimmer Mist to give them some sparkle and shine.
 I cut a few holly leaves with my Sizzix....
 And inked them with the other two colors of Distress Ink that were in the kit, Evergreen Bough and Iced Spruce. (hint, a quick fold down the middle, run the fold directly over the pad, and you get a nice vein)


As I am sure you know that when you step under the mistletoe you are inviting a kiss; but did you ever wonder where the tradition came from? Like many of our current traditions, this one comes from the middle ages, but was updated during the reign of Queen Victoria. I found a detailed story here if you are interested, but here is an excerpt....
People would take a potato or apple and tie a pretty ribbon around it as a hanger. Then they would stick sprigs of evergreen, holly and sweet herbs into the potato or apple until it bristled with them.
The herbs in the sweet ball took on the highly romanticized symbolism common to the Victorian area. Simon and Garfunkel weren't the only ones singing about "Parsley, Sage, Rosemary and Thyme". Each of those herbs plus dozens and dozens more flowers, herbs and plants spoke a unique and private symbolic language to Victorians. The choice of herbs, flowers and boughs could state love, affection, charity, piety and more.
I decided to create my own version of a kissing ball using some beautiful flowers, Distress Inks, and Glimmer Mist from the Your Memories Here store; a bit of seam binding and a styrofoam ball.


I attached the flowers to the ball using my Helmar 450.
To finish off my project I ran a bit of seam binding across the Evergreen Bough, and added a Prima Rose. A few Prima pearls in the center of each flower and my kissing ball was ready to hang.

I hope I have inspired you to create a little holiday magic in your home this season.
Hugs.
Nancy
November 28, 2011
Forever Missed- DT Project
Its yet another Monday and I am so excited to share this layout with you that I created using the papers from the Prima Grab Bag and one of the stamps from the Tattered Angels Architectural Trims.. Those stamps are amazing and I am finding more and more uses for them..
so, here is my project for today's reveal:

This layout will have a photo of my dad who passed away last February.. I just don't have the strength yet to rummage through his old photos.. all in due time :)
I wanted to play around with the papers for this layout.. so, I cut some and rolled them into little rolls, which I glued down to the bottom right hand corner using Helmar quick drying adhesive, adding some paper swirls and then ribbon..

I wanted to stick with the black and white, but then decided to add the little blue flowers because my dad had light blue eyes.. I thought it added a nice touch of accent color to the layout..
I once again added Crackle Accents to the face of the clock, but you can't see the crackle cause the base of the clock is black..LOL another lesson learned..LOL

I found a Prima Lace Rosette in my stash and then hand journaled the date he passed away on the top.. I love how versatile these papers are.. You can use them for any occasion!!

and the stamping.. Oh how I love these stamps.. I used the Brick work stamp and Ranger Embossing ink, with White Embossing powder.. Then heat set it.. I love it!! looks pretty cool.. I thought about rubbing some Black ink on it, but then at the last minute decided to just leave it as is..
and for supplies used:
From the Your Memories Here store:
papers: Prima Printery collection
From my own stash:
prima Rosette
flowers, ribbon, feather, liquid pearls, cardstock and white embossing powder.
the font I cut with my Cricut Expression..
I really love how this layout turned out..Trying to keep it semi simple by just using the papers and some embossed stamping.. I know in my heart my dad would of loved this.. he used to like watching me create..
I want to thank you lovely ladies for stopping by today and checking out my Monday project..
I certainly hope I have inspired you to get out your papers and stamps and get crafting.. :)
I hope everyone has a wonderfully crafty week..
Hugs
November 27, 2011
A Special Gift For Some Very Special People.
Good Afternoon blogland!
I am sorry this posting is rather late in the day but I had to deliver this gift today before I could post it out in public. For those who do not know when I started working at Autozone I was working with a young guy from New York. We became fast friends and and his girlfriend at the time also became a friend of mine. James and Aly are remarkable people. They are magic to watch as a couple and I have a huge affection for them both. They moved to North Carolina earlier this year and I miss working with James immensley....but his career has taken a turn for the best and so has Aly's since they have been down there.
So when James called me almost 2 months ago and told me he had purchased a ring to propose I was beside myself! As cheesy as this is going to sound he is like a son to me...with the bonus of being a great friend. So when he told me how he was going to propose etc I was almost as excited as he was as he planned it all. So the time passed and finally I got the text saying she had said YES! (like there was ever a doubt she would!)
So I set about making a tiny album using manilla tags for them to place a few photos from that wonderful proposal. I wanted to use the gorgeous new Printery range from Prima as it is so elegant and will highlight their photos from that night.
I used some of the new Prima bling as well throughout the album. I inked all edges with Tim Holtz Distress Ink in Vintage Photo and Peeled Paint. I edged in Distress Stickles in Antique Linen. On the d-ring I knotted various colours of seam binding and in the middle I have used a Marion Smith Vintage Resin Drop. It was a rpoject made with love for special people in my life....and the smiles when they opened it today at lunch was well worth it :)
I hope you all had a wonderful Thanksgiving surrounded by loved ones and that it was a safe one!
Until next weekend.....
I am sorry this posting is rather late in the day but I had to deliver this gift today before I could post it out in public.
 For those who do not know when I started working at Autozone I was working with a young guy from New York. We became fast friends and and his girlfriend at the time also became a friend of mine. James and Aly are remarkable people. They are magic to watch as a couple and I have a huge affection for them both. They moved to North Carolina earlier this year and I miss working with James immensley....but his career has taken a turn for the best and so has Aly's since they have been down there.
So when James called me almost 2 months ago and told me he had purchased a ring to propose I was beside myself!
 As cheesy as this is going to sound he is like a son to me...with the bonus of being a great friend. So when he told me how he was going to propose etc I was almost as excited as he was as he planned it all. So the time passed and finally I got the text saying she had said YES! (like there was ever a doubt she would!)
So I set about making a tiny album using manilla tags for them to place a few photos from that wonderful proposal.
 I wanted to use the gorgeous new Printery range from Prima as it is so elegant and will highlight their photos from that night.
I used some of the new Prima bling as well throughout the album. I inked all edges with Tim Holtz Distress Ink in Vintage Photo and Peeled Paint. I edged in Distress Stickles in Antique Linen. On the d-ring I knotted various colours of seam binding and in the middle I have used a Marion Smith Vintage Resin Drop. It was a rpoject made with love for special people in my life....and the smiles when they opened it today at lunch was well worth it :)
I hope you all had a wonderful Thanksgiving surrounded by loved ones and that it was a safe one!
Until next weekend.....
Subscribe to:
Posts (Atom)