May 31, 2011

Birthday Wishes!


Hey y'all! Hope everyone had a fab Memorial Day weekend & enjoyed some time doing what they love the most! Me, well, I am posting this crafty creation late due to some computer issues we experienced over the weekend w/our laptop. Please forgive me for being late! I chose to create a fun cuppie gift tag using a new Cricut cart that I picked up for....ta-dah, $10! The cart is all about cupcakes &, since I love baking & cuppies, it is perfect for me. Can't wait to create some more fun projects with it - I'm definitely thinking birthday banners, cuppie toppers, and invites...oh my! And if you own a Cricut & would love to get some great products for it & a great price, check out the YMH Store HERE. Not only does the store carry some great Cricut supplies, but other ProvoCraft products like Cuttlebug...again, at great prices!


Supplies
Pink Cardstock - Close to My Heart
Sentiment/Swirl Stamp - Studio G
Ink - Stampin' Up (white), Tim Holtz Distress (walnut stain)
Tag - Shabby Chic Crafts
Ribbon - American Craft
Silver Twine - Stampin' Up
Adhesives - Glue Glider Pro, Aileen's Fast Grab Tacky Glue
Brad/Pearls - Stash


I also made sure to use some of my favorite paper products on my gift tag, Cosmo Cricket! You knew it was coming, right?! This particular Cosmo Cricket paper is available in the Hey Sugar Kit at the YMH Store & is chock full of fun goodies. I have literally been playing with it for months & have a ton of products left! You have your choice of 2 versions of this fab kit for only $10!! You must VISIT HERE to get your own! Also, that Tattered Angels cardstock is from the Spooky Memories Kit I purchased last September...yeah, still got goodies from it too & I have made several projects with it!


Whew! I am just so happy to finally get my project posted & hope that you like it! I would love it if you would visited my blog HERE. Make sure to check out the YMH Store for lots of great crafting supplies too. Until next time, Happy Craftin'!


May 28, 2011

Prima CASE

I saw this card on PRIMA's blog and knew I had to CASE it as I just happened to have one of the clear doilies packaging on hand. I also had on hand several flowers and bling leftover from the Prima kits that I've gotten from YMH. The card was really easy and came together fast for me. The base is a turquoise color that I sponged white ink around the edges and then layered the clear packaging from Prima on top of it using some glossy accent for it. After that it was just a matter of playing with the flowers and bling. That's one thing I really love about the Prima kits, you get all kinds of great leftovers to use for other projects. After getting all of the flowers and bling glued down in place I decided to create a banner using a PTI dies and sentiment from PTI's Friends 'til the end stamp set chosing ink colors from the flowers (yellow and turquoise).


May 26, 2011

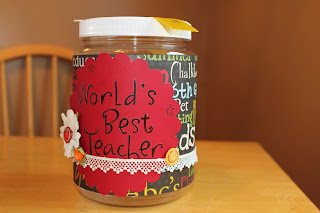
 Hello and Happy Thursday! Today is the last day of school for my 2 little girls. Next year I'll have a 1st grader and a 3rd grader. That is so crazy to me. So, to celebrate all the hard work that a Teacher does for our children why not give them an end of the year Thank You.
 I wanted to show you what 2 Prima flowers, 1 leaf and a piece of scrap lace can do! I think it turned out super cute and the possibilities on what you could put in there are endless.
You should go check out yourmemorieshere.com to get your goodies!!
 Hope you have a great day! I'm going to go enjoy the last few hours I have of peace and quiet until the fall.
  :) KIM

May 25, 2011

Hi everyone, Nancy here with a layout I just completed with a great sketch that my friend Sara did for an upcoming Ideas for Scrapbooker's blog post.  I love using all the beautiful embellishments available in the Your Memories Here store.


I chose some beautiful Prima flowers, a Prima butterfly and bird, Prima bling, (I am sensing a trend here), and finally some Prima lace for my embellishments; then dyed my seam binding with some Tattered Angels Glimmer Mist.  I, of course, used my Helmar 450 to hold everything in place.  It worked perfectly to scrunch my seam binding and always does an amazing job holding down my lace and flowers.

What have you been working on lately?

Hugs.

Nancy

May 21, 2011

Flowered teabag

Another quick post as life has been off this week. Trying to come up with something for DS's teacher before school lets out for the summer and I came across this teabag template. I thought it would make for a sweet little gift package for her. The stamped frame was the perfect frame for my Prima sugar coated flower and the paper came from a Tattered Angels kit that I got from YMH. What really helped me add the depth to the project was Helmar's Scrapdots. This bad boy adhesive is what gave the depth to the flower and stamped ribbon. I distressed the edges a little and then sponged with some light brown ink and then to help the flower flow with the bag I edged the white of the bag in glitter as well as the stamped ribbon. It's simple but it's cute. Now to come up with something to put inside of it...maybe she likes tea...


May 19, 2011


 I have had to work extra days this week due to a co-worker going on vacation so my crafty time has been very limited. I altered this crate a while ago, actually I think it was one of my first kits I bought from yourmemorieshere. No wonder I got hooked huh?
 I thought I would inspire you to find something around the house, at a thrift shop, or a rummage sale to alter and make your own. It's simple...PRIMA! I used some adirondack ink to color the wood and sprayed it down really good with some dazzling diamonds and in person the wood has a very pretty sparkle to it. Then I added pretty pretty Prima flowers. I can't wait to hit the rummage sales this summer to look for things with potential. Prima potential! LOL
I hope to have something fresh and new next week!
  Go get crafty!
     KIM :)

May 18, 2011

Altered Book - a la Marion Smith/ Live with Prima

Hi everyone, Nancy here.  Recently I received one of the beautiful Live with Prima Kits from the Your Memories Here store.  And I have to tell you, it was so fun to make!  Have you had a chance to watch the ustream broadcasts?  There are so many wonderful tips and techniques.  And you know the projects are just gorgeous, featuring all the best Prima products conveniently packaged and at a great price in the store.


Helpful hint?  I have seen many of the videos in the past and have always found it very helpful to watch the video all the way through before starting on my project.  Trying to watch and work along is just more than I can handle, as some of the techniques are often new to me and a bit complex.

So, what do you do if project of your dreams is currently sold out?  Well, you know Your Memories Here sells many of the products individually.  Marion Smith Vintage Trinkets, lots of blooms and bling, maybe a few bits of trim, I am sure you will be able to find products that would suit your needs.

I even used some of my favorite Glimmer Mists to make my flowers the perfect color.  And did I mention how many goodies I had left over?  

Well, be sure and check out all the fabulous Live With Prima Kits.  You won't be disappointed.

Hugs.

Nancy

May 16, 2011

Wedding Shadowbox!

Whew! I am plum tuckered out after a long weekend...after both a graduation party & wedding, plus a movie date with my mommy in law before she headed to New York for work, I am posting this late so please forgive me! A busy weekend, but full of fun! So, I am back again this week with another frame for Your Memories Here...except this one is a shadow box & was quite the undertaking for me. However, I love how it turned out & I hope the bride & groom from Saturday night's wedding love it as well, because that's to whom it was given!!

Supplies
Cardstock & Script Paper - The Paper Studio
Shadow Box Frame - Michael's (actually a t-shirt frame & LO's fit perfectly!)
Black & Gray Flowers - Recollections
White Silk Flowers - Michael's
Leaves - Wilton
Stickles - Ranger
Distress Ink - Tim Holtz (walnut stain)
Adhesive Rhinestone Swirls - Joleene's
Adhesive Die Cut Scallop Border - Echo Park (for the record kit)
Adhesive - Glue Glider Pro, Aileen's Fast Grab Tacky Glue, Scotch Double Sided Tape
Vintage Metal Button - Stash

I absolutely adore Prima products & they were just perfect for this frame! I loved the gorgeous paper & the mini roses are so fabulous. You can get plenty of beautiful Prima products RIGHT HERE at the YMH Store so make sure to visit! The inspiration for this frame came from one I seen at Michael's. And if I can say so myself, I don't think theirs was as nice, plus they wanted $20 for it! I decided to create my own version & did it for much, much less...actually, after coupons & sales, I spent somewhere around $10. You can't beat that! And those cute little spiral green stems you see as accents? Those are simply the wire stems from the Prima roses! Yep, just cut them off, curl them around a pencil, stretch out a little bit, & adhere with some strong, fast drying glue. I really like the realistic look they give to the flowers, don't you? By the way, those cute rhinestone swirls, they are a new product from Joleene's I believe, well at least new to my Michael's, & are very dimensional & made out of resin, or something similar. Love that they were adhesive too. Very cool.


I had so much fun creating this frame for the YMH DT & for our friends...I can't wait to see what photo they add to the shadow box from their amazing & gorgeous wedding! Thanks so much for stopping by to visit me again today & I hope you check out the YMH Store. There are always fab products at amazing prices up for grabs, with wonderful shipping too! And don't forget about the YMH DT Inspiration Blog...we'd love to have you come take a peek at what we've been up to. I am blessed to be on such a talented DT because those other gals' projects are so amazing! I'll be back soon with another fun project & until then, lots of hugs, blessings, and Happy Craftin'!
 

May 14, 2011

Birdcage

I have been wanting to do this since I saw this one on the Prima website back in February. When I first got the idea I had wanted to do blue egss but when I bought this cage with the nest and eggs already in it and saw how well it went with the Prima flowers and vines and decided to nix the blue eggs. I am loving this vines from Prima (I used two different colors) and enjoyed mixing in some extra Prima flowers. These muted colors are a subtle spring and work just as well for the summer months. Since the vines have wire in them the piecing of this together went really fast. Be sure to visit Your Memories Here to pick out your Prima goodies.


I used:
Flowered Tendrils Lemon and Pinck
Floret Coll. Camille (little roses)
Love Letter Roses peridot (big yellow roses)
Fairytale Roses French White

May 11, 2011

Misting Fabric

Hi everyone, Nancy here.  Last Saturday was National Scrapbook Day for many of us and I managed to convince my family to give me a bit of a break so I could play with my supplies.  I found a fun challenge over on Scrapbook.com and decided to participate.  The challenge was to make a mini album featuring yourself.  I love mini albums so this was right up my alley.

I started with some plain canvas, three of my favorite colors of Tattered Angels Glimmer Mist and a water sprayer.

The first thing I did was spray my fabric with water to dampen.

 Then I began spraying with color.  Starting with the darkest color, the one I wanted on the bottom.....

then adding my next color, being sure to overlap a bit....

And finally the color I wanted on top.

I then took a 1 inch paintbrush and blended the colors.  After all the water and mist, the fabric was quite damp and it was easy to blend the colors just how I wanted.

Here is my final, dyed fabric.  Starting with a damp fabric really helps the colors flow and blend.

From there, I dry brushed a bit of white paint over the top and inked the edges.  I glued the fabric to chipboard for the cover of my album and with the help of my Bind it All....


a few Prima flowers and leaves, a Prima Journaling Card, Prima alphabet, and some gorgeous Vintage Trinkets and my album was finished.

Hope you are having a great day!

Hugs.

Nancy

May 10, 2011

Still in Vacation Mode

Hey everyone, I'm back from my trip but still can't get into the swing of things. Is it possible to have jet lag if you've only flown from Florida to Ohio?
While at Disney World we went to Epcot, which was holding their annual Flower and Garden festival and WOW how beautiful it is. All the different plants, flowers and topiaries. It was a treat for the eyes and the nose :) It also gave lots of inspiration for some projects using Prima flowers. While the Epcot Flower and Garden festival will come to an end soon this month, the beauty of Prima's flowers will last forever (and you gotta love that!)
So I'm sharing with you some of my family's vacation pictures until I can get my butt in gear and make a project.


May 8, 2011

Altered Rose Frame!


Happy Sunday my crafty peeps! I am back to share a super easy way to alter a frame that would either make a fab gift or add a nice touch to your favorite photo. I discovered a plain, brand new, ready to alter frame at a Goodwill store for 99 cents...yep, 99 cents compared to the the $4 bucks it is at the craft store. Woo-hoo! All other items I had on hand so not only was this project super duper cheap, it was super duper easy & turned out really cute...I just love it!! However, if you want to get this yummy paper for yourself, check out the YMH Store HERE! But not only does the YMH Store carry all things Prima, but also Tattered Angels products (such as the mist I used), Imaginisce goodies and much, much more!! Ya know, like the Cosmo Cricket yummies I love so dearly...hehehe!!

After painting the edges of the frame with some black craft paint, I Mod Podged a gorgeous piece of Prima paper to the surface. While that dried I spritzed some white silk flowers with some Tattered Angels Glimmer Mist in Vintage Rose. I absolutely love how the flowers turned out. After the flowers & frame were dry, I hot glued the roses & some leaves to the frame. I cut some of the green wire off the flower/leaves stems, curled them around the pencil & added them with hot glue for more dimension. 


I finished off by drawing some swirls on the frame & using my Imaginisce iRock tool to adhere the pink glimmer studs. If you don't have one of these, you must get one! I absolutely love mine! I just recently got it & this was my first time using it but it was so easy & the result was fabulous. I cannot rave enough about this product! I haven't yet added a photo to the frame since I am still deciding on one. However, the mat I threw in there for now is simply the backside of the same Prima paper. So you can use 1 full size sheet of a pretty 12x12 paper & that's all you'll need!! 


Thanks so much for stopping by today....and if you want to get in on some blog candy & fun prizes, visit my blog HERE for all the info. Now through Monday I am participating in a very cool Power of Work blog hop to promote Goodwill stores nation wide so I'd love it if you visited & played/hopped along! 
Until next week, Happy Craftin'!!

May 5, 2011

Family Paper Sack Book

 Finally got my pictures loaded. Blogger has been acting really funny so I'm gonna keep it short and sweet so I can get this posted! Geesh. I hate to post and run but I didn't have Internet last week so I am trying to make up for it. :)
 I make these paper sack books all the time. I do them custom a lot for people asking for a specific theme. Anything from a new baby to New Kids on the Block. Seriously.
 I'm sure you've noticed by now that I love Prima, everything Prima. I used Prima lace and flowers in this book and Wheatfields and Vanilla Bean Glimmer Mist.
 It's ready for pictures! Please go check out yourmemorieshere.com and check out all the pretty things!

 I hope you all have a great weekend! See ya next Thursday! :)
Happy Crafting!
    Kim