November 30, 2011

Kissing Ball

Hi everyone, Nancy here with a fun holiday project for your home.

As I am sure you know that when you step under the mistletoe you are inviting a kiss; but did you ever wonder where the tradition came from?  Like many of our current traditions, this one comes from the middle ages, but was updated during the reign of Queen Victoria.  I found a detailed story here if you are interested, but here is an excerpt....


People would take a potato or apple and tie a pretty ribbon around it as a hanger.  Then they would stick sprigs of evergreen, holly and sweet herbs into the potato or apple until it bristled with them.
The herbs in the sweet ball took on the highly romanticized symbolism common to the Victorian area. Simon and Garfunkel weren't the only ones singing about "Parsley, Sage, Rosemary and Thyme".   Each of those herbs plus dozens and dozens more flowers, herbs and plants spoke a unique and private symbolic language to Victorians.  The choice of herbs, flowers and boughs could state love, affection, charity, piety and more.
I decided to create my own version of a kissing ball using some beautiful flowersDistress Inks, and Glimmer Mist from the Your Memories Here store; a bit of seam binding and a styrofoam ball. 
I used Festive Berries from the LE Winter Distress Inks to color each flower from the Prima Wildflowers Pillar. (a handful of flowers was all I needed.)
 And then spritzed them with a bit of Dazzling Diamonds Glimmer Mist to give them some sparkle and shine.
 I cut a few holly leaves with my Sizzix....
And inked them with the other two colors of Distress Ink that were in the kit, Evergreen Bough and Iced Spruce.  (hint, a quick fold down the middle, run the fold directly over the pad, and you get a nice vein)
I attached the flowers to the ball using my Helmar 450.

To finish off my project I ran a bit of seam binding across the Evergreen Bough,  and added a Prima Rose.  A few Prima pearls in the center of each flower and my kissing ball was ready to hang.

I hope I have inspired you to create a little holiday magic in your home this season.

Hugs.

Nancy

November 28, 2011

Forever Missed- DT Project

Its yet another Monday and I am so excited to share this layout with you that I created using the papers from the Prima Grab Bag and one of the stamps from the Tattered Angels Architectural Trims.. Those stamps are amazing and I am finding more and more uses for them..  

so, here is my project for today's reveal:

This layout will have a photo of my dad who passed away last February.. I just don't have the strength yet to rummage through his old photos.. all in due time  :)
I wanted to play around with the papers for this layout.. so, I cut some and rolled them into little rolls, which I glued down to the bottom right hand corner using Helmar quick drying adhesive, adding some paper swirls and then ribbon..


I wanted to stick with the black and white, but then decided to add the little blue flowers because my dad had light blue eyes.. I thought it added a nice touch of accent color to the layout..
I once again added Crackle Accents to the face of the clock, but you can't see the crackle cause the base of the clock is black..LOL  another lesson learned..LOL


I found a Prima Lace Rosette in my stash and then hand journaled the date he passed away on the top..  I love how versatile these papers are.. You can use them for any occasion!!


and the stamping.. Oh how I love these stamps.. I used the Brick work stamp and Ranger Embossing ink, with White Embossing powder.. Then heat set it.. I love it!! looks pretty cool.. I thought about rubbing some Black ink on it, but then at the last minute decided to just leave it as is.. 

and for supplies used:
From the Your Memories Here store:


From my own stash:
prima Rosette
flowers, ribbon, feather, liquid pearls, cardstock and white embossing powder.
the font I cut with my Cricut Expression..

I really love how this layout turned out..Trying to keep it semi simple by just using the papers and some embossed stamping.. I know in my heart my dad would of loved this.. he used to like watching me create..
I want to thank you lovely ladies for stopping by today and checking out my Monday project..
I certainly hope I have inspired you to get out your papers and stamps and get crafting..  :)
I hope everyone has a wonderfully crafty week..
Hugs


November 27, 2011

A Special Gift For Some Very Special People.

Good Afternoon blogland!

I am sorry this posting is rather late in the day but I had to deliver this gift today before I could post it out in public.For those who do not know when I started working at Autozone I was working with a young guy from New York. We became fast friends and and his girlfriend at the time also became a friend of mine. James and Aly are remarkable people. They are magic to watch as a couple and I have a huge affection for them both. They moved to North Carolina earlier this year and I miss working with James immensley....but his career has taken a turn for the best and so has Aly's since they have been down there.
So when James called me almost 2 months ago and told me he had purchased a ring to propose I was beside myself! As cheesy as this is going to sound he is like a son to me...with the bonus of being a great friend. So when he told me how he was going to propose etc I was almost as excited as he was as he planned it all. So the time passed and finally I got the text saying she had said YES! (like there was ever a doubt she would!)
So I set about making a tiny album using manilla tags for them to place a few photos from that wonderful proposal. I wanted to use the gorgeous new Printery range from Prima as it is so elegant and will highlight their photos from that night.
I used some of the new Prima bling as well throughout the album. I inked all edges with Tim Holtz Distress Ink in Vintage Photo and Peeled Paint. I edged in Distress Stickles in Antique Linen. On the d-ring I knotted various colours of seam binding and in the middle I have used a Marion Smith Vintage Resin Drop. It was a rpoject made with love for special people in my life....and the smiles when they opened it today at lunch was well worth it :)

I hope you all had a wonderful Thanksgiving surrounded by loved ones and that it was a safe one!

Until next weekend.....

November 25, 2011

Happy Birthday Card....Your Memories Here

Hi everyone....Sandi here today wishing you all "Happy Friday". Only one month from today and it will be Christmas! So not ready but I may put my tree up on Sunday. Here is a card I made from Prima goodies from the Your Memeories Here store.

I used papers from the Londonerry collection, Prima flowers, ahphas and lace and some Websters bloomers.

I also did a little sewing and added some Ranger Dimensional Pearls in Lettuce for a little dimension.

Thats it for now so head to the store and get some of these goodies and get 30% if your entire order....WOW. Hope you have a wonderful weekend!

Sandi

November 23, 2011

Ruby Wednesday


Hi everyone, Nancy!  I hope you here in the US are enjoying the day before Thanksgiving!  I know I am.

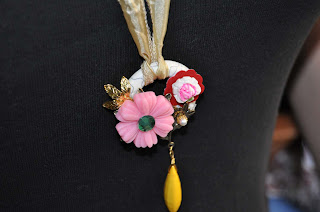
I recently received from Your Memories Here some gorgeous, fun products from the new Prima line, Ruby Violet.   You know, when the package arrived I couldn't wait to dive right in!

 There are so many gorgeous flowers.  So fun, so funky.
The necklace kits can be assembled in any way you choose, but for those who are new to making jewelry, there are photos of finished projects you can just copy. (and you may even have a few leftover pieces for another project.)
One of my favorite things though is that you don't need jump rings, pliers, or other jewelry making tools.
I used just a bit of Helmar's Scrap Dots to hold everything together.  But I would imagine the Gemstone glue would work just as well or better.

I had so much fun making these pieces that I think I may pick up a few more kits for my nieces for Christmas.  They are only $8.00 in the Your Memories Here store, but during this weekend's Black Friday sale everything is 30% off with the code TURKEY.

Happy Wednesday.

Hugs.

Nancy

November 21, 2011

Lovely Ladies LO- DT project for YMH

Happy Monday ladies... 
Its NannĂ© again I am practically dying to share another project I created with my handy dandy Prima Grab bag..  I received the Prima Printery collection and it had lots and lots of goodies in it, but I wanted to play around with color this time and see exactly what colors work together..

Here is my layout I created:


So, I started out by getting some brown cardstock and a few stamps.. I first used one of the smaller stamps in the Tattered Angels Architectural Set,  Ranger Embossing ink and clear embossing powder.. stamped it randomly on the top of my layout and then heat set the embossing powder.. Rubbing Distress Ink over it afterwards and realized it almost resembles burlap.. how cool is that ? and I got lots of ideas running through my head on how else I can end up using it.. Hmmmmm
My stamped butterflies..


I cut a 8x8 piece of black cardstock and then use one my MS around the edge punches to make the base of my photo mat then started layering the Printery Papers.. choosing the blacks , tans and creams this time..
I distressed the edges and got everything glued down..
I then played around with some of the flowers in my stash and decided to use the aqua colored Prima roses.. In the grab bag comes a big selection of different colored flowers and the aqua rose with the gem in the middle, is one those flowers.. Loving it!!
I did some fussy cutting on this layout .. There are so  many wonderful images on these papers and I didn't want to leave anything out.. the clock above the photo is fussy cut from the same piece of paper as are the little circle images.. which I used my 1" hole punch and punched those out..
I also used some of the Gem glue to glue down the string of pearl, which I love this stuff cause it leaves no glue to see once its dry.. I used to use glossy accents, but it left a shiny streak.  Not this stuff.. Its perfect!!
I did add some Crackle Accents to the face of the clock, which I love how old and vintage it turned out.
The above photo is of my daughter on the left, my mom in the middle and me on the right..
close up of the crackled clock..
see.. No glue streaks under the pearls..

I did end up using some of my own embellishments, like the feathers,lace, ribbon, string of pearl, some of the flowers,  leaves, fragment charms and pearl halves.. 


I also grabbed a Tim Holtz fragment charm and crackle accented a piece of the punched paper onto the back of, adding some ribbon and then pop dotted it behind the flowers in the left corner.. I noticed that it did not crackle as I had hoped..LOL  lesson learned!!
These smaller flowers (its a set) you see in this upper photo also come in the grab bag. I love the colors and go well with so many color variations..


I had a way too much fun putting this layout together and trying out new techniques..
so, from the Your Memories Here store I used.


from my own stash. 
distress tool, MS edge punch,  Aqua roses, small flowers, string of pearl, pearl halves, Tim Holtz Stamps, Stay-z-on black ink pad, fragment charm, hat pins, leaves, lace and ribbon..

well ladies... That does it for me for this Monday.. I want to thank you all for stopping by and checking out what I've been working.. I certainly hope I have inspired you to grab your Prima's and get crafting...LOL
Hope everyone has a wonderfully crafty week..
Hugs

November 20, 2011

Repurposing Fun


Good Morning Blogland!

This week I decided to repurpose a memo board I had purchased some time ago. It used to sit upon my desk here in the office with photo just attached to it and it was rather nice but boring at the same time. So last night after I got home from work and it was silent (the hubby was at a CCW class and the daughter was in PA with her friends) I turned up the music and started to play! I pulled the board apart and grabbed my warm white paint...I layered it on quite thick so it covered the cherry wood finish completely.

The black frame around the outside was painted using a gold metallic paint from my stash. I purposely left the inner edges their original colours so it gave shadow and depth to the overall piece. I then reached for the gorgeous Alla Prima A4 stack of papers and proceeded to choose my paper for the background. I love the softer tones to this paper and it goes well with the outcome I was hoping for. The flowers are the birdy vine are leftovers from my Grab Bag and they suit the project to perfection! Adding just the right amount of bling without being over the top!

The wooden mirror surround is from my stash and I spritzed it with some Glimmer Mist. I used my Big Shot to cut the houses,inking them with two distress inks and laid them at the base of the frame. The floral peat was MESSY to use but I loved the dimension it gave the overall project. Once we get a family photo for the holiday season done I will have it enlarged to go into this frame and hang it happily in my office :)

I hope you liked the project...I am really thrilled with the outcome!

Have a great week!

November 18, 2011

Mosiac Picture Frame

Hi everyone....Sandi posting today to share with you how I transformed a Michaels wooden frame to this frame using some gorgeous embellies from the Your Memories Here Store. Sorry for the crappy picture but it is so dark here today.
This was a tile that we were considering using for our kitchen backsplash. I just tore each one off and glued to the wooden frame using Aleene's Fast Grabbing glue. As you can see I used a very generous coat of glue and plotted the pattern first to make sure the tiles lined up with the frame opening. Here are a few photos:


I then embellished using Prima flowers,leaves, bling, resist canvas butterfly and lace .I also altered the color of the large flower using Glimmermist(Decadent). That's it for me so be sure to visit the store and I would love for you to to visit my blog. Hope you have a wonderful weekend!
Sandi

November 16, 2011

My Treasure Box

Hi everyone, Nancy here with a project I completed recently.  I had a bunch of Cricut cartridge boxes lying around the house so......


With a little help from the Prima grab bag I received from Your Memories Here, I transformed my cartridge box into this cute little treasure.
More of my A4 paper pad, a few beautiful Prima blooms, gorgeous bling, leaves, an adorable resin birdhouse and the cutest little birds nest were all adhered to the box using Claudine Helmuth Multi Medium.  I even used a button on the side of my box to help open it.
I misted my seam binding with Glimmer Mist in Sugar Maple and Suede and tied it in a huge bow.

I think I will use this box to house an art journal (that I have yet to make...hee hee).  But it may just hold some pretty little goodies.  I really can't decide.

Thanks for stopping by.

Hugs.

Nancy

November 14, 2011

Prima Printary-DT project by Nanné

Living in Finland, I rarely get the opportunity to get me some Prima papers.. I was sooooo over joyed when Kristina sent me my very first prima grab bag..  I was like a kid in a candy store..LOL  It was hard to choose what papers and flowers I wanted to scrap with first.  
Last Monday I shared my first layout that was made using the Printery collection and now today, I get to share the second one..
I am so in love with these colors and the prints are amazing.. 
so, here is my layout:
I once again started out with simple white cardstock.. Crinkled it in hands.. rubbed some distress over it to catch onto the crinkley bits..<-- sounds so funny LOL  Then grabbed my favorite stamp set ever (Tattered Angels Architectural trims) and two different colored distress inks.. dabbed the two inks randomly on the stamp and then starting from the middle, stamped my way out to the sides.. Because the ends of the stamp match,  you can make the stamped image as long  or as short as you want.. 
This way, I was able to Create a nice border on both the top and the bottom of the layout.. 
for a few close ups:
The photo is of my little Amber when she just turned 3 years old, she is now 22yrs old.. She was playing outside when I took this photo of her.. 
The flowers are by Prima.. The tiny roses are from the Grab Bag and
My favorite which is the fabric one  from the Whispers Collection..
The cream and the black rose are from the same collection of Prima's.. I hand cut the banner, adhered it to the layout using foam tape squares and then cut the flourish and the title with my cricut imagine and black cardstock.. adding some bling and white liquid pearl drops..

Supplies I used from the Your Memories Here store:

Prima Grab Bag:
Printery paper collection
Mini roses
Say it in Crystals

Ranger Distress Inks
Tattered Angles Architectural Stamps
foam tape squares


from my own stash:
Prima roses, Leaves, Liquid pearl, ribbon, distress tool and cardstock
I cut the title and flourish with my Cricut Imagine die cutting machine.

Thats it for me again for this lovely Monday.. I want to once again thank you lovely ladies for stopping by and checking out what I've been creating.. It certainly has been fun :)
I hope everyone has a wonderfully creative week.
Hugs

November 13, 2011

Late Night Creativity

Good Morning Bloggers -- I hope today finds you all well and smiling. I was up late last night with music blasting my ear drums while I got into the creative zone. The original idea is somewhat skewed in my project but overall I am pleased with the outcome. I have had this little paper mache suitcase for a little while and I was not quite sure what to do with it until last night. I was going to attempt to make it into a vintage leather look beat up suitcase...but that didnt happen! Instead I used some gorgeous Pink Paislee papers from my stash and some of the new Prima flowers and ribbon/crystal pieces that came in my grab bag of goodies that I got from Your Memories Here
These flowers are just gorgeous and I love the texture to them as well. The gems can be manouvered very gently so you can get extra bling for your project. The vines are just as beautiful to use and they team very nicely with the metallic Prima leaves

This beautiful butterfly is leftovers from a kit that YMH had from the Live With Prima kits.. and the lace trim is also available in the store HERE. Now that I have this gorgeous little suitcase, I am going to place him on my shelf along with other projects that I dont have a home for and move onto the some Christmas gifts that I need to get made while I still have the time.

Dont forget there is a Retreat in April through Your Memories Here....you can read all about it HERE I have already booked my place and I can not wait to go!! A weekend of scrappy fun with amazing talented women...is it April yet??

Have a great day everyone :)